Control Servo motors with Nextion HMI – Part 3 Final!
Today, let’s bring it to an intermediate end – for the moment. We have seen basics about servo control here and we have already prepared the Arduino side by adding some code to our ongoing Nextion Mega IO Extender project here.
Those who haven’t followed the Nextion Mega IO project over the last months are cordially invited to read :
– The Nextion MEGA IO project – Part 1 – Nextion
– The Nextion MEGA IO project – Part 2 – Nextion
– The Nextion MEGA IO project – Part 3 – Nextion
– The Nextion Mega I/O project – Part 4 – Nextion
– The Nextion Mega I/O Project – Part 5 – Nextion
– Working with bit fields – optimize your code – Nextion … and …
– Boosting the Nextion Mega I/O project with new knowledge (6)
This will help you in understanding what we do today. And you’ll perhaps also fall in love with the hyper efficient custom protocol which uses just 2 bytes for read requests and 3 bytes for write requests, and which allows to address 12 PWM outputs, 16 analog (ADC) inputs, and any combination from 0 servos and 32 GPIO pins to 8 servos and 24 GPIO pins. And this (with future extensions) x 8 Arduino Megas. The protocol is ready for that. Imagine the possibilities!
The configuration

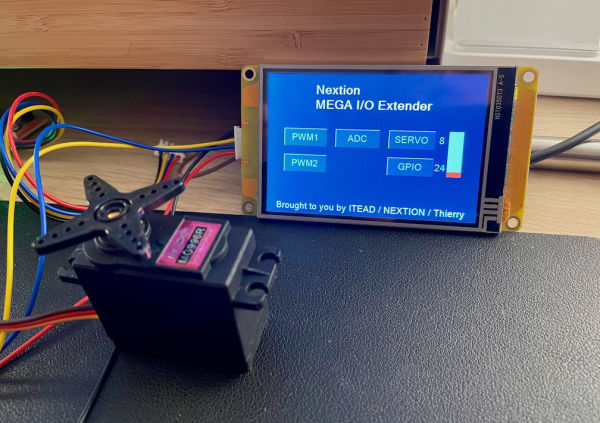
In a first step, the Nextion has to tell the Arduino how many of the 32 GPIO pins (from 22 to 53) should be reserved for servo control. By default, it’s 0, but we can go up to eight with the new slider on the home screen. Besides the SERVO button, you’ll then see the number of allocated servo channels and besides the GPIO button (which hasn’t yet any effect) the number of remaining GPIO pins. Remember from last week, the servo channels are allocated from top to bottom: The first servo on pin 53, the second on pin 52 and so on. This makes that when we change the number of servo channels at runtime, every connected servo keeps its channel number. Thus, each time the configuration slider is released, the corresponding set command is sent to the Mega. At the same time, the global variable servo.scfg is also set, so that at page load, the number of channels, and thus, the number of sliders to display has not to be read back from the Mega, but is already available.
Slider h0 Touch Release Event
// Update the display
n0.val=h0.maxval-h0.val // This is to reverse the slider direction ;-)
n1.val=32-n0.val
// Make the write request for the Servo setting, type=0, channel=15, data=n0.val
// Reverse byte order because prints is sending in little endian format
h0.val=h0.val // Snap in
temp=n0.val<<16
temp|=0x7880
prints temp,3
servo.scfg.val=n0.val
Naturally, we’ll have to know on startup, which number of servos had previously been configured on the Mega, so we issue a read command for the setting on page load:
Page Postinitialize Event
// read request for the SERVO setting from the Arduino Mega
listener.en=0
printh C0 78
listener.en=1
And we need naturally the usual listener, a timer which checks periodically the incoming responses from the Mega and which acts accordingly when the correct data type 0 for settings and the correct channel (15 for the servo configuration) will come in. It is very similar to the listeners we have already for PWM and ADC.
Timer “listener” Event
// Check if something has arrived in the buffer
while(usize>2)
{
  // Check if the first byte in the command buffer is a command byte, if not, discard it
  if(u[0]<128) {
    udelete 1
  }else
  {
    // Check if there seems to be a valid write command in the buffer and process it
    if(usize>=3&&u[1]<128&&u[2]<128) {
      // Check if it is for this page (write SET)
      if(u[0]==0x80) {
        channel=u[1]>>3&0x0F
        data=u[1]&0x07<<7|u[2]
        // Check if it is channel 15 for Servo settings
        if(channel==0x0F)
        {
          h0.val=h0.maxval-data
          n0.val=data
          servo.scfg.val=n0.val
          n1.val=32-data
        }
      }
      // Discard the command
      udelete 3
    }else
    {
      // Delete the orphaned command byte
      udelete 1
    }
  }
}
And now, the servo control itself
I won’t lie, I created the servo page simply by duplicating the PWM1 page and by adapting some details in the code and the screen afterwards. Everything is, thanks to our hyper efficient protocol, very similar.
On the screen, the .maxval attribute of all 8 sliders has to go down from 255 to 180 because most servos only handle values from 0° to 180°. Then, the captions with the Mega pin numbers below the sliders had to be changed to show pins 59 down to 46. That’s all for the GUI side. Now to the code:
On page load, the first thing is, depending on the number of configured servo channels stored in the scfg variable, to show or to hide the corresponding sliders, using the vis command. And for those which aren’t hidden, read the current servo position from the Mega and set the slider’s position accordingly. Besides the show/hide, it’s pretty the same as for the PWM1 page…
Page Postinitialize Event
// show only active channels, hide the others, request current value from Arduino
listener.en=0
for(temp=1;temp<=8;temp++)
{
  if(temp<=scfg.val)
  {
    vis b[temp],1
    // build and send the read command
    mask=temp-1<<11
    mask|=0x00C7
    prints mask,2
  }else
  {
    vis b[temp],0
  }
}
listener.en=1
Who says read command must naturally implement a listener for the Mega’s answer. And this one is very similar to the listener on the PWM1 page. Only the constants for decoding change since we are on a different data type (Servo instead of PWM). I marked them in bold, so that you see that the difference is minimal.
Timer “listener” Event
// Check if something has arrived in the buffer
while(usize>2)
{
  // Check if the first byte in the command buffer is a command byte, if not, discard it
  if(u[0]<128)
  {
    udelete 1
  }else
  {
    // Check if there seems to be a valid write command in the buffer and process it
    if(usize>=3&&u[1]<128&&u[2]<128)
    {
      // Check if it is for this page (write SERVO)
      if(u[0]==0x87)
      {
        channel=u[1]>>3&0x07
        data=u[1]&0x01<<7|u[2]
        b[channel+1].val=data
      }
      // Delete the processed command from the buffer
      udelete 3
    }else
    {
      // Delete the orphaned command byte
      udelete 1
    }
  }
}
Finally, we need, also similar to the already well known PWM page, a touch handler which will send the updated slider value to the Mega and thus to the servo. The changes, compared to the PWM touch handler are again minimal. And with this, our servo control is already complete!
TouchCap “touchhandler” Touch Release Event
listener.en=0
// restrict action on the 8 sliders, having obj ids from 1 to 8
if('&val&'>=1&&'&val&'<=8)
{
  // construct the second data byte from the last 7 bits of the slider's value :
  cmdbuf=b['&val&'].val&0x007F<<5 // and shift it left by 5 bits
  // construct the first data byte from channel address and MSB of the slider's value
  cmdbuf+='&val&'-1<<3 // the channel address
  if(b['&val&'].val>=128)
  {
    cmdbuf+=1 // set bit d7 if the slider's value is >=128
  }
  cmdbuf<<=8 // and shift it left by 8 bits
  cmdbuf|=0x87 // command bit set and bits T2 to T0 to 7 (SERVO)
  prints cmdbuf,3
}
listener.en=1
With this, our Nextion Mega IO project is almost complete. The only thing still missing is the GPIO control which we’ll see next. Afterwards, since there are still 10 data types unused in our protocol, we might add more controls. I’m always open for your suggestions!
All the code
As usual, you won’t have to retype everything in the Nextion editor, here is the current .hmi file: mega_io_ext_7.HMI
I also cleaned the Arduino code somewhat up since last week, here the latest version: NexMegaIOdemo_7
For today, thank you for your patient reading and happy Nextioning!
Last, but not least
You have any questions, comments, critics, or suggestions? Just send me an email to thierry (at) itead (dot) cc! 🙂
And, by the way, if you like and you find useful what I write, and you are about to order Nextion stuff with Itead, please do so by clicking THIS REFERRAL LINK! To you, it won’t forcibly make a change for your order but on some products, you may even get a 10% discount using the coupon code THIERRYFRSONOFF. In ever case, it will pay me perhaps the one or the other beer or coffee. And that will motivate me to write still more interesting blogs 😉


