Our Blog
The Endian question – binary communication between Nextion and Arduino
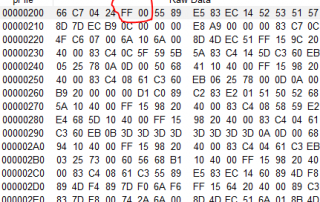
Over the last months, we have seen a huge progress in the Nextion Mega IO project. Time for a little break to answer recurring readers' questions. Today, we'll talk about data formats in binary communication. An important point as soon as we leave the default ASCII command communication using the Nextion instruction set. For the Nextion Mega IO project, we introduced a much more compact binary protocol, first to gain on transmission speed, second to showcase the Nextion's protocol reparse mode, and third because it's fun to explore new paths 😉 . Our goal for today is to understand a bit of theory which will allow us to rework somewhat the Nextion Mega IO code in the future to make it simpler, easier maintainable and readable, and still more flexible. Then, adding the control over the up to 32 GPIO pins which we still have to implement, will be very easy. And later, when it comes to high speed communication between Arduino and Nextion for a CAN bus project (spoiler!), we will be thankful for all this preliminary work!
Control Servo motors with Nextion HMI – Part 3 Final!
Today, let's bring it to an intermediate end - for the moment. We have seen basics about servo control here and we have already prepared the Arduino side by adding some code to our ongoing Nextion Mega IO Extender project here.

Control Servo motors with Nextion HMI – Part 2
As we have seen in part 1 of this article series, we need an external MCU, for example an Arduino, to control servo motors with our beloved Nextion HMIs. Now, let's see how this can be achieved in practice. Since we are already building a universal IO engine with the ongoing Nextion Mega IO project, we will not reinvent the wheel. We'll just extend what we already have at hands.
Control Servo motors with Nextion HMI – Part 1
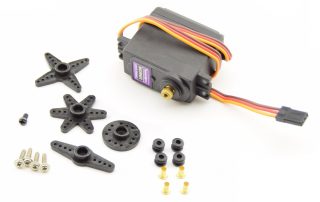
Over the last weeks, I got several mails from readers asking about the use of servo motors (or short, servos) together with Nextion HMI. The ones wanted to control a few servos directly from the Nextion's (Enhanced and Intelligent series) GPIO, others suggested to extend the Nextion Mega I/O project to allow controlling servos. The scientific approach is to gather information before taking a decision or even starting a development, thus, let's look at how servos work and how they are controlled, first. And then, let's see how the Nextion HMI can be used for that.
Building a Countdown timer – answering a reader’s question
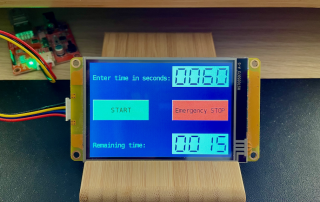
After reading the following question of a reader, let's call him "J.", in a Nextion Display related group on Facebook, I decided spontaneously to make it a small project for this Blog: "Hello I'm new in using Nextion Intelligent Display! Can someone help me? I want to make a timer where the user can enter how many seconds he wants to run and also show how much time is remaining before it ends. Thanks a lot if you can help me💜"
Boosting the Nextion Mega I/O project with new knowledge (6)
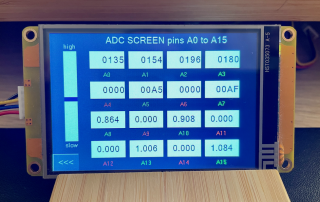
Up to now, the highlight of our ongoing Nextion Mega I/O project is the ADC page which allows to monitor all 16 analog input pins of an Arduino Mega at once. With little modifications in the UI design, by putting either a Number or a Float component for a specific channel, we can select the desired display format without caring about conversion of or scaling the reading. The timer event code will chose the right formula by detecting the component type beforehand. All that is really great, but what if we do not need (or not all the time) all 16 channels? Is there a way to permanently disable (freeze/hold) the one or the other channel in order to reduce the workload of the Mega's ADC and the amount of data transferred? The answer is yes, and thanks to what we saw in the last Sunday Blog, it's easy-peasy!