Building a Countdown timer – answering a reader’s question
Introduction
After reading the following question of a reader, let’s call him “J.”, in a Nextion Display related group on Facebook, I decided spontaneously to make it a small project for this Blog:
Hello I’m new in using Nextion Intelligent Display! Can someone help me? I want to make a timer where the user can enter how many seconds he wants to run and also show how much time is remaining before it ends.
Thanks a lot if you can help me💜
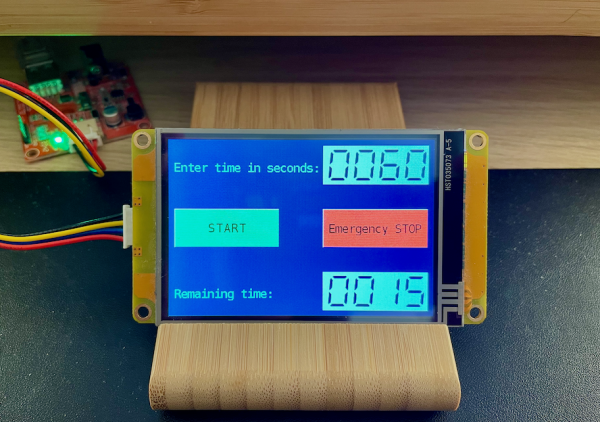
The ingredients
1) We will need a numeric variable into which the user can enter the “Set” value, that means the number of seconds which the timer shall run. For this, we take a Number component n0. Since we want to use the built-in numeric keypad, we set its .vscope attribute to global before we set its .key attribute to numeric keyboard\keybdB.
2) Then, we’ll need another numeric variable which will be set to the “Set value” and which will be decremented by 1 every second. Since this corresponds to the remaining time which shall also be displayed, we’ll use another Number component n1 for that.
3) A “Start” button b0 will simply copy over the value from n0 to n1 and enable the timer component (see below). Then, it should most probably take some more action because starting the timer is normally intended to execute a task during a specified period of time. J. didn’t specify that, thus I put just a placeholder in the code as you’ll see later. To avoid ambiguous situations, everything is inside an if() clause which checks if a valid number of seconds has been set (n0.val>0) and if the timer is not yet already running (tm0.en==0)
// Make sure that some time is set before we take action
// and that the timer is not already running
if(n0.val>0&&tm0.en==0)
{
  n1.val=n0.val // set the start value
  tm0.en=1 // start the timer
  // *** Put some more start action code here ***
  // For example :
  // Trigger GPIO or
  // Send some serial code to the MCU
}
4) A “Emergency Stop” button b1 shall allow to interrupt the timer at every time. That means setting n1 to 0 and to disable the timer. Again, some more action is most probably wanted, here is place holder in the code, too. Here, too, we want to avoid ambiguous states and an if() clause checks wether the timer is running at all (tm0.en==1).
// Execute only if the timer is actually running
if(tm0.en==1)
{
  n1.val=0 // reset the display
  tm0.en=0 // stop the timer
  // *** Put some more stop action code here ***
  // For example :
  // Untrigger GPIO or
  // Send some serial code to the MCU
}
5) A timer tm0 which is disabled by default by setting its .en attribute to 0. Since we want it to count seconds, we set the .Tim attribute to 1000 (milliseconds). The timer’s event code is the heartbeat of the project. In a first step, it checks if n1.val is > 0 and decrements it then by 1. In a second step, it will independently check if n1 has reached zero and if yes, it shall execute some stop code, similar to what happens when you press the “Emergency Stop” button. Thus, there is no need to duplicate the code, we use the click function to have the timer simply click that button:
if(n1.val>0)
{
  // if there is time left
  n1.val-- // just decrement the remaining time
}
if(n1.val==0)
{
  // if time is elapsed
  click b1,1 // trigger the stop routine
  click b1,0 // release the button
}
Finish the UI
Now, add two text components as captions or labels for the Number components: t0 with a .txt_maxlen of 22 and .txt = “Enter time in seconds:“, and t1 with a .txt_maxlen of 15 and .txt = “Remaining time:“, some fonts and colors to taste and you are finished.
Conclusion
Again, the “KISS” (Keep It Simple and Safe) principle was applied, so that we get a maximum of effect with a minimum of components, code lines, and RAM usage. As I repeat often in my Sunday Blog articles and the answers I give in the Nextion forums, the most important thing is to have the whole project ready with all details, either in your mind or with pencil and paper before you start coding and designing the UI. For this article, I replaced that with the “List of ingredients” above. After listing the functional components and describing their respective actions, writing the event code bits was pretty straightforward.
As always, I attach the HMI file and you are not only allowed but even encouraged to load it into the Nextion Editor, to study it, to check it out, to modify it to better fit your needs, and even to re-use everything in your own projects. Another advantage of a simple and highly optimized approach is that you can easily recompile it for different Nextion HMI series and sizes by clicking on the “Device” button in the top toolbar of the Nextion Editor: countdowntimer.HMI
Last, but not least
You have any questions, comments, critics, or suggestions? Just send me an email to thierry (at) itead (dot) cc! 🙂
And, by the way, if you like and you find useful what I write, and you are about to order Nextion stuff with Itead, please do so by clicking THIS REFERRAL LINK! To you, it won’t make a change for your order. But it will pay me perhaps the one or the other beer or coffee. And that will motivate me to write still more interesting blogs 😉


