Boosting the Nextion Mega I/O project with new knowledge (6)
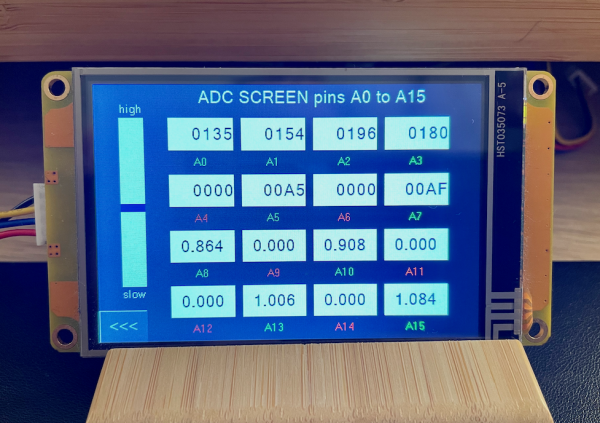
Up to now, the highlight of our ongoing Nextion Mega I/O project is the ADC page which allows to monitor all 16 analog input pins of an Arduino Mega at once. With little modifications in the UI design, by putting either a Number or a Float component for a specific channel, we can select the desired display format without caring about conversion of or scaling the reading. The timer event code will chose the right formula by detecting the component type beforehand. All that is really great, but what if we do not need (or not all the time) all 16 channels? Is there a way to permanently disable (freeze/hold) the one or the other channel in order to reduce the workload of the Mega’s ADC and the amount of data transferred? The answer is yes, and thanks to what we saw in the last Sunday Blog, it’s easy-peasy!
Introduction
You should have read beforehand:
– The Nextion MEGA IO project – Part 1 – Nextion
– The Nextion MEGA IO project – Part 2 – Nextion
– The Nextion MEGA IO project – Part 3 – Nextion
– The Nextion Mega I/O project – Part 4 – Nextion
– The Nextion Mega I/O Project – Part 5 – Nextion … and …
– Working with bit fields – optimize your code – Nextion
Especially after lecture of the latter, you’ll already understand what we’ll do and how we’ll do it: We’ll make the captions below the reading display fields (A0, A1, etc…) clickable to enable or to disable the corresponding channel. A single TouchCap component will help us to capture the TouchPress Events and to handle everything since the action is very similar for each – putting individual event code for each of the 16 Text components would be a huge waste. But how to handle the on or off state for each of the 16 channels?
The configuration UI
After reading the last blog about bit fields, you understand that one single integer variable will be sufficient. And we’ll use only its half, 16 of the 32 available bits. If we want channel A0 to be enabled, we set bit 0 to 1, otherwise to 0. And accordingly, bit 1 for channel A1, bit 2 for channel A2 and so on. Since the Text components have their object IDs from 17 to 33 (while the Number or Float components displaying the ADC readings have 1 to 16 and it’s the page itself which has always the object id 0), our event code in the TouchCap tc0 will first filter for the corresponding object IDs from 17 to 33 to prevent misfiring from touching any other component. Then, it will calculate the global variable (defined in program.s since we might use it on other pages, too) bitindex simply by subtracting 17 from the object ID, so that it takes a value between 0 and 15 for the corresponding channel, A0 to A15. In the next line, we calculate the bit mask mask (another global, defined in program.s) by left shifting 1 by bitindex positions. Thus, the 16 lowest bits of the mask will look like this:
0000 0000 0000 0001 for channel A0, 0000 0000 0000 0010 for channel A1, … and so on, until … 0100 0000 0000 0000 for channel A14, and 1000 0000 0000 0000 for channel A15.
The state of all 16 channels will then be held in the local variable config to which we gave nevertheless a global scope, so that its value is preserved even after unloading and reloading the page. Now, toggling a channel on or off is as easy as bitwise XOR-ing config and mask and to save the new value again in config. Remember, in the places where mask has a “0”, the corresponding bit in config will remain unchanged. But in the place where we have the “1”, the corresponding bit in config will be negated. That means that if it was “0”, it becomes “1” and vice-versa. That will make that the channel which was off before will now be on, and if it was on, it will now be off. Toggling easily accomplished in TouchCap tc0 TouchPress event code:
// On press enable or disable channel (toggle)
if(tc0.val>16&&tc0.val<33)
{
  bitindex=tc0.val-17 // make it zero based
  mask=1<<bitindex // set the corresponding bit
  cfg.val^=mask // toggle the config bit
  click b[0],0 // update the display coloring
}
What about the last line, “update the display coloring” ? Depending on the “1” and “0” bits in config, the corresponding Text field should display the channel either in green (on) or in red (off/frozen). Since the corresponding code is not only required after manually toggling the state of a channel, but also after loading the page to adapt the interface colors to the (preserved) value of config, I’ve “hidden” the corresponding code in the page’s Touch Release event code, so that it can be triggered from everywhere with a click page,0:
This time, we use a simple for() loop to let bitindex run from 0 to 15, generate each time the corresponding maks as above, and use a logical AND with config. If the corresponding bit is “1”, the result will be greater than zero, but if it is “0”, then, the result is forcibly zero. And that’s what we use to decide, if the corresponding Text component’s text color or .pco attribute will either bee GREEN or RED, using the predefined constants of the Nextion Editor – let’s look at the page’s TouchRelease event code:
// enable/disable display depending on cfg
for(bitindex=0;bitindex<16;bitindex++)
{
  mask=1<<bitindex
  mask&=cfg.val
  if(mask>0)
  {
    b[bitindex+17].pco=GREEN
  }else
  {
    b[bitindex+17].pco=RED
  }
}
And finally, controlling the Mega’s ADC accordingly
The good news is, we do not need to touch at the Arduino code for this extension, thus, the last version (given in part 5) remains valid. We also do not need to touch at our listener: If our caller does not request data from a specific channel, the listener will automatically not receive data for this channel, and the Mega does not have to do the corresponding analogRead(). Thus, everything is very efficient and we just need to teach the caller to request data only for those channels whose corresponding bit in config is “1”.
This asks for reworking the caller. At the beginning, the code is very similar to the display color update. We cycle through all 16 bits of config with the help of bitindex and mask. Then, to save on memory, we re-use mask to build the two bytes which our Nextion has to send to the Mega to request an analog reading for the specific channel if the corresponding config bit is “1”. Using a variable to build the command and data byte means unfortunately that we can not longer the printh command, but we’ll have to use the prints command and limit it to two bytes. That means, too, that since prints uses the little endian format (LSB first), we’ll have to put the command byte in the rightmost position, and the data byte left of it. Learning by doing… 🙄 – here the new event code for the caller timer:
// read requests depending on the set bits in cfg variable
listener.en=0
for(bitindex=0;bitindex<16;bitindex++)
{
  mask=1<<bitindex
  mask&=cfg.val
  if(mask>0)
  {
    mask=bitindex<<11
    mask|=0x00C3 // reverse byte order because prints sends little endian
    prints mask,2
  }
}
listener.en=1
With this, after a channel is toggled off, it is just not longer requested, which frees up communication bandwidth and resources. And, as a side effect, its last read value remains frozen on the screen until the page is unloaded.
Here, as always, the updated hmi file: mega_io_ext.HMI 6
Questions, comments, critics, suggestions? Just send me an email to thierry (at) itead (dot) cc! 🙂
And, by the way, if you like what I write, and you are about to order Nextion stuff with Itead, please use my referral link! To you, it won’t make a change for your order. But it will pay me the one or the other beer or coffee. And that will motivate me to write still more interesting blogs 😉


