The Sunday Blog: Advanced programming
Nextion HMI as a csv file viewer
After having discussed the theory of file based databases in the last article, it’s time to demonstrate what can be done with coding only in Nextion language and using the FileBrowser, FileStream, and DataRecord components. And this article will also tell about some actual limits of this approach. But nevertheless, today’s project has become a nice and (partly) flexible viewer for .csv files on the SD card.
The FileBrowser component
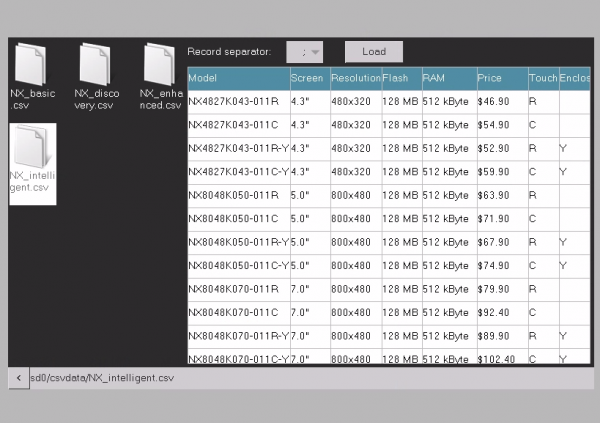
Its .dir attribute is set to sd0/, so that we start at the root of the SD card’s file system. To reduce confusion, I suggest to store the data files in a subdirectory. Mine is called “csvdata”, and so, at startup, the file browser does only show me a single folder icon, labeled “csvdata/” and that’s it. Clicking on it will reveal its content, all the 4 example csv files which I had put there, like in the above image. For convenience, I added a Text component at the bottom of the screen, which shows the current path, and the file name when a file is selected. The code to update this path/file text is in the TouchRelease event of the button b0 (see below). Thus, the file browser triggers that remotely in its own TouchRelease event, using the click function:
// update the bottom line
click b0,0
Button b0 in the bottom left corner calls the .up() function of the file browser on TouchPress, to move one level up in the directory hierarchy:
fbrowser0.up()
On TouchRelease, as mentioned before, the file path display is updated, and then, there is still a check if a file is currently selected: If yes, the “Load” button b1 becomes visible, otherwise it will be hidden.
t0.txt=fbrowser0.dir+fbrowser0.txt
// check if file is selected (not directory)
strlen fbrowser0.txt,tmp
if(tmp>0)
{
  vis b1,1
}else
{
  vis b1,0
}
And that’s it. Everything is pretty straightforward, up to now.
Opening and reading the selected file
All the work is done in the “Load” button’s (b1) TouchPress event. The current path (in t1) is copied to the FileStream’s (fs0) .open() function. Then, by using the .find(“\r”) method and a few variables to hold the start and end position of each line, the selected file is read line by line into a text Variable component lineBuffer.txt in a loop. Before moving to the next line, there is some work to do, to split it into the different fields and re-assemble these with the required delimiters to insert them into the data record.
As we have read in my last article, there are different standards for line endings. The Nextion supports only one of these, called internally “\r”, but in reality, it’s two ASCII control bytes, 0x13 and 0x10, which is the Windows standard. So, take care to generate your csv files with this line ending. Other standards like only 0x13 or only 0x10 (as in Linux or macOS) are not supported by our viewer.
The first line of each csv file should hold the column labels or field names, all following lines will be interpreted as data. Again, there are different standards to separate the individual fields within a line. Often, it’s a semicolon (“;”) or a comma (“,”), sometimes a colon (“:”). That’s why I added a ComboBox component which leaves you the choice between these 3. Your selection (the semicolon is the default separator) is then used with the spstr method to get the fields within the line. As you might already know, the DataRecord’s header labels have to be separated by a circumflex in the .dir attribute, like header0^header1^header2… In a similar way, the .insert() method to append data takes a string as parameter: field0^field1^field2… Thus, reading a line, splitting it into fields using your custom delimiter, recombining these with circumflexes into another string is the same procedure for headers and data which eases greatly our coding.
In an ideal world, we’d analyze the header line of our file, count the fields and set the column count of our DataRecord accordingly. This is unfortunately not possible, the DataRecord’s .dez attribute can not be modified at runtime. So, I decided for a limited variable approach: The developer sets the number of columns to x at design time, and the code will take this x to loop through the fields of a line. If there are more than x fields or headers in the lines, the exceeding ones will simply be ignored. If there are less than x fields or headers in a line, it’s not a problem because the spstr method will return an empty string when using a non existing index, leaving the corresponding columns of the DataRecord empty without rising an error.
Here is the full code:
//clear the data0.cache
data0.clear()
//initialize variables
lineCount=0
lineStart=0
//try to open the file
fileRet=fs0.open(t0.txt)
if(fileRet>0)
{
  //set the file pointer to the beginning (just to be sure)
  fs0.val=0
  while(fileRet!=0)
  {
    //look for a line ending
    fileRet=fs0.find("\r")
    if(fileRet>0)
    {
      //read the line into the line buffer
      lineEnd=fs0.val
      fs0.val=lineStart
      fs0.read(lineBuffer.txt,0,lineEnd-lineStart)
      //convert field separators:
      dataBuffer.txt=""
      for(loopVar=0;loopVar<data0.dez;loopVar++)
      {
        strlen dataBuffer.txt,tmp
        if(tmp>0)
        {
          //add a field separator before the next field
          dataBuffer.txt+="^"
        }
        //extract the field data
        spstr lineBuffer.txt,recBuffer.txt,cb0.txt,loopVar
        //and append it to the data buffer
        dataBuffer.txt+=recBuffer.txt
      }
      //add the line to the data record component
      if(lineCount==0)
      {
        //line 0 is the header
        data0.dir=dataBuffer.txt
      }else
      {
        //all other lines are data lines
        data0.insert(dataBuffer.txt)
      }
      lineStart=lineEnd+2
      //move the file pointer to the beginning of the next record
      fs0.val=lineStart
      lineCount++
    }
  }
  fs0.close()
}
… and we are done!
As usual, you may download the project .hmi file to play with it, modify it or integrate it into your own projects here: csv_demo.HMI
And the demo csv files to extract onto the SD card (or to put into the virtual SD folder when using the simulator) are here: csvdata
Questions, suggestions and criticisms are – as always – welcome in the nextion.tech forums (registration required).
Happy nextioning!


