The Sunday Blog: Understanding and Customizing HMI components
Part 3: Color encoding, Sliders, Subroutines, and a Hue control
First of all: Did you read about the NEXTION Summer Contest where you can win a NEXTION HMI display and a Foca Max adapter? The deadline is today!
As promised in last week’s episode, we will discover today another great feature of the hotspot component, in conjunction with the slider component to learn more about Nextion‘s RGB565 color encoding scheme. We’ll use all that to build a tiny hue control with a 3.2″ Standard HMI, as usual.
16bit RGB565 color encoding
As most of you valued readers already know, almost all opaque colors can be decomposed in three components: A Red, a Green, and a Blue component (hence the common RGB denomination) which can easily be described by a simple integer number, each. The overall luminosity is the sum of all three values while the hue results from the individual ones. While in early computing times, the used 4 or 8bit numbers weren’t large enough to display color tones in a differentiated way and slow and complex color palette switching techniques had sometimes to be used, it’s not a problem nowadays to use a 16bit number (or even larger) to hold 65536 different color tones. Now the question is which of the 16 bits is responsible for which color component? The answer is the standardized RGB565 encoding scheme: Of the available 16 bits, the 5 most significant ones (bits 15 to 11) hold the red component which can thus take values from 0 to 31. The 6 middle bits (10 to 5) hold the green component which can take values from 0 to 63, while the 5 least significant bits hold the blue component with values from 0 to 31.
The project concept
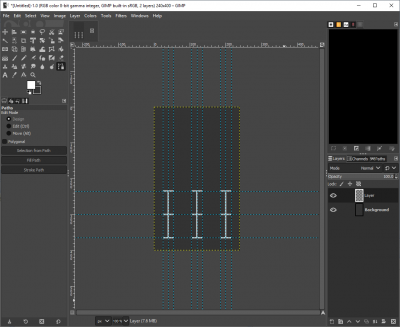
Our concept is fairly simple: Let’s take three sliders, set them up to have all a minval attribute of 0, and maxval attributes of 31 for the first (red) and the third (blue) sliders, and 63 for the second (green) slider. Now, we see that the default style attribute of these is solid color with a red slider on a green background, which didn’t look very appealing in our context. Thus, I decided to design rapidly a single page background picture in Gimp, which shows 3 scales for the sliders, and after importing it as a picture resource, I set the sliders’ sta (which stands for style attribute) to “crop image” and their pic (picture) attribute to 0, so that they would pick their background image from our imported picture, cropped depending on their position which gives a nice transparency effect. Finally, I decided to color the slider knobs in the respective component colors, leaving the psta (pointer style attribute) on solid and setting the respective pco (pointer color) attributes to 63488 (plain red), 2016 (plain green), and 31 (plain blue).
Finalizing the GUI
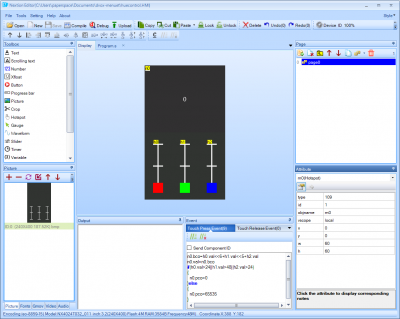
Now, always following the “kiss” principle (“keep it simple and safe”) and to keep resource usage low, I looked for a single component which would allow me to display the selected (generated) hue and the corresponding RGB565 color code. I choose the number component. I made it big, taking up the upper half of the display by setting its width to 240 and its height to 200. It allows to display the hue by setting its bco (background color) attribute to the calculated value and to display the corresponding number through the val (value) attribute.
The coding part
Now, the question was, how should my HMI react on changes in slider positions? Using their Touch Press or Touch Release Event as usual wouldn’t make much sense, since we probably want to fine tune the displayed color tone. That’s why we’ll put our code into the Touch Move Event, so that changes become visible already while moving the slider.
Code? Which code? After thinking a few seconds, it’s always the same procedure:
– Take the value of the red slider, shift it left by 6 bits to make space for the green bits
– Add the value of the green slider, and shift the result left by 5 bits to make space for the blue bits
– Add the value of the green slider
– Set the number component’s bco attribute to the result
– Set the number component’s val attribute to its bco attribute
That’s 2 lines of code:
n0.bco=h0.val<<6+h1.val<<5+h2.val
n0.val=n0.bco
Last but not least, adapt the number component’s pco (plot color) attribute either to white (65535), when the resulting color tone is dark (all sliders below 75%) or to black (0) if at least one slider is above 75%:
if(h0.val>24||h1.val>48||h2.val>24)
{
  n0.pco=0
}else
{
  n0.pco=65535
}
That makes 9 lines of code which one could replicate in the Touch Move Event of all 3 sliders. But that is not a good idea! Imagine, you need to debug or to modify the code. You’d have to always do that in all 3 places and 3 times in the same way. That is neither simple nor safe! So let’s think like a software developer and let’s see if we can’t pack that into a single function or subroutine which would then be called from all tree sliders’ Touch Move event.
A subroutine container
Remember, I promised you to show a “hidden” feature of the hotspot component. Here it is: Let’s add a hotspot to our page. Let’s put our 9 lines of code into its Touch Press Event. Now, hide the hotspot behind our number component by using the “Bring bottom” function of the formatting toolbar (that’s the down arrow). Finally write or copy/paste simply
click m0,1
in the Touch Move Event of each of the three sliders. Thus, each time a slider is moved, it will “click” the hidden hotspot which will then execute the common event code which is only in one single place. Isn’t that simple, safe, and fantastic?
As usual, you won’t have to re-create all the graphics, fonts, and the project code. You can download the huecontrol.hmi file from the Nextion forums and play around with it. Have fun!


