Arduino handles Nextion touch events universally
– with simple code
After we saw last week that we could make the Arduino handle simple button touch/press events (but many of these) with a few lines of code on both sides, but without any complex library, it’s time to move on! Today, no coding on the Nextion side will be required, and though, your Arduino will register every single TouchPress and TouchRelease event which happens on the Nextion. Afterwards, it will be up to your Arduino code to decide on which event (press or release or both) of which component and on which page it will react and how (or not). And still no library needed!
How is that possible ?
In the Nextion Editor, after placing or selecting a component on a page, when we look closer to the code pane, we see a checkbox labeled “Send Component ID”. There is one in the Touch Press Event tab and one in the Touch Release Event tab. And it is not only there for buttons, but for every visible and thus touchable component: Text boxes, Pictures, Sliders, etc., you name it!
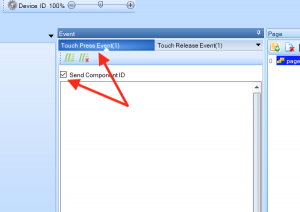

After checking one of these checkboxes, you’ll discover that the label of the tab changes for example from Touch Press Event(0) to Touch Press Event(1). That indicates us that the Editor has added a hidden line of code. We have no idea how this code looks, but we can see the effect when we launch the Debugger/Simulator and click with the mouse on a component:

Obviously, that hidden code sends now a packet (or frame) of 7 bytes, each time a component is pressed or released: The first byte is 0x65 hexadecimal or 101 decimal, indicating that a touch press (or release) message will follow. The second byte is the page ID (0 here in our example). The third byte is the object (or component) ID. As you can see in the example above, these frames were generated from two different components, one with the object ID = 1 and one with the object ID = 2. The fourth byte tells us which event has happened: 1 stands for “press”, and 0 for “release”. Finally, like all Nextion protocol messages, there are three 0xFF bytes, indicating the end of the message.
Before we look on the Arduino side how to deal with these frames, let’s finalize our test setup. We will place 3 buttons on the screen, label them accordingly and check the checkboxes of all 3 buttons for their respective press and release events. If you prefer a readily made .hmi file, please find it attached at the end of this article.
The Arduino side
Caution: We will go through 66 lines of Arduino code (comments including). And yes, it could have been done with half the number of code lines. But I wanted to create an easy to understand code on one side, and on the other side, I want this code to be somewhat flexible, so that it can in the future be extended to process other types of Nextion messages, too!
A few basics
As we’ve seen in previous articles, it is important to free up the Arduino’s serial input buffer as soon as something arrives to avoid that more incoming data will make the buffer overrun. Thus, we’ll introduce a kind of double buffering, copying the incoming data and build up our own buffer called nexBuffer, byte by byte. Since we are expecting frames of 7 bytes, a 7 byte buffer will do the job – for the moment, but we’ll take 8, just to be sure. We put the desired buffer size into a #define , so that we may easily modify it later. Then, we need a variable nexCounter in which we count how many bytes have been transferred to our buffer. Finally, it might happen that due to line noise or our Nextion code going nuts, much bigger frames (with more bytes than the expected 7) arrive. In that case – and in combination with the 3 x 0xFF detection to see when a message is completely transmitted (see next paragraph), we need our nexCounter value to remain smaller than our buffer size to avoid writing out of the buffer array bounds, and we need a flag which tells us that this particular message is invalid, by setting a bool variable nexOverflow to true.
When is the message complete ?
As we know, it’s after receiving 3 of these 0xFF bytes. Thus, each time we receive a 0xFF, we’d have to look up if the previous byte was by any chance also a 0xFF, and the byte before, too. That sounds complicated and it is technically complicated to code. We’ll use a different approach: We introduce another variable nexFFcounter which starts always at 0. When a byte arrives AND it is a 0xFF, we increment the counter by one. If the following byte is again a 0xFF, we increment the counter again. If it is not a 0xFF, that means that the preceding 0xFF was isolated and part of the message and we reset nexFFcounter to zero. Then, the game may start over again. As soon as nexFFcounter reaches 3, meaning that we had 3 consecutive 0xFFs, we are sure that the message is correctly terminated and we set another bool variable nexCmdReady to true.
With all this, we have already covered the first 37 lines of Arduino code:
In a first step, we declare all the aforementioned global variables
#define NEXBUF_SIZE 8
byte nexBuffer[NEXBUF_SIZE] = { 0x00 };
byte nexCounter = 0;
byte nexFFcounter = 0;
bool nexCmdReady = false;
bool nexOverflow = false;
Then, in setup(), we simply initialize the serial communication
void setup() {
  // put your setup code here, to run once:
  Serial.begin(9600);
}
In the first part of loop(), we check if there is an incoming byte, copy it over to our buffer, do the 0xFF check and set nexFFcounter and the nexCmdReady flag accordingly. Then, nexCounter is incremented in preparation for the next incoming byte and the overflow check is done, which will reset nexCounter and set the nexOverflow error flag.
void loop() {
  // put your main code here, to run repeatedly:
  if (Serial.available())  // check if there is something to read
  {
    byte c = Serial.read();     // read the byte
    nexBuffer[nexCounter] = c;  // copy the byte over to our nexBuffer
    // do the terminator check logic
    if (c == 0xFF) {
      nexFFcounter++;  // ah, a 0xFF !
    } else {
      nexFFcounter = 0;  // that wasn't a 0xFF - start over
    }
    // let's see if there are enough terminator bytes
    if (nexFFcounter == 3) {
      nexCmdReady = true;  // we received 3 consecutive 0xFF and are done
    } else {
      nexCmdReady = false;  // we aren't yet done...
    }
    nexCounter++;  // position for the next byte to come
    // do a buffer overflow check
    if (nexCounter >= NEXBUF_SIZE) {
      nexOverflow = true;  // set the error flag
      nexCounter = 0;      // reset the pointer to avoid writing out of the buffer bounds
    }
  }
  ...
And now, finally, let’s look what we got
If the nexCmdReady flag is set (true), we may continue our investigation, otherwise we do nothing and let loop() loop until more bytes arrive. Continuing our investigation means checking next if the nexOverflow flag is NOT set (false). If it were, though, we consider the just received and correctly terminated message as invalid and jump over to resetting everything without further action.
But, if there was no overflow, we have probably a valid message and may finally look closer at it.
Remember what we are expecting: 7 bytes, starting with 0x65.
A check for 7 bytes alone would not be sufficient, it may theoretically be that we started our checks while the Nextion was transmitting a longer message and we accidentally got the last 4 bytes of it, followed by 3 0xFF terminator bytes.
For similar reasons, checking for the first byte alone to be 0x65 would not be sufficient, it could be part of a longer or shorter message. Thus, we check for both.
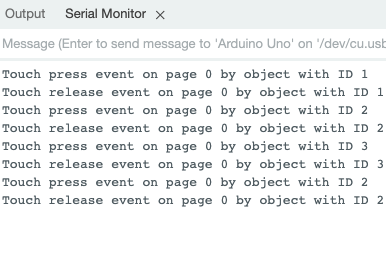
Now, things are pretty easy: It is sufficient to copy the second byte into a variable page, the third byte into objId, and the fourth into event. With these three informations, we have everything to react accordingly to a particular event, for example switching a relay on or off when a specific button is pressed or released with a simple if() clause.
Here, for demo’s sake, I simply added a few Serial.print lines to give some output on the serial monitor, so that one can check if the page, objId and event variables are correctly “decoded”.
  // phew... after all these checks on byte and buffer level, let's look onto the whole frame
  // if 3 consecutive 0xFF have been received:
  if (nexCmdReady) {
    if (!nexOverflow) {                               // process only if there were no errors
      if (nexCounter == 7 && nexBuffer[0] == 0x65) {  // check if we received exactly 7 bytes starting with 0x65
        byte page = nexBuffer[1];
        byte objId = nexBuffer[2];
        byte event = nexBuffer[3];
        // The following lines give just some output on the Serial monitor,
        // Replace with meaningful code like using GPIO to switch LEDs or relays or whatever...
        Serial.print("Touch ");
        if (event == 1) {
          Serial.print("press");
        } else {
          Serial.print("release");
        }
        Serial.print(" event on page ");
        Serial.print(page);
        Serial.print(" by object with ID ");
        Serial.println(objId);
      }
    }
    // reset everything:
    nexCmdReady = false;
    nexOverflow = false;
    nexFFcounter = 0;
    nexCounter = 0;
  }
}
Again, there are more efficient ways to write that code, but I wanted it to be easily understandable, following the required processes step by step.
As last week, this code may even run on an Arduino Uno, even though there is no dedicated serial port for the Nextion. There is also no need for ugly crooks like SoftwareSerial. We can use the native serial port in parallel with the integrated USB converter. At the beginning, we connect only the Nextion’s black wire to the Arduino’s GND pin and the red wire to the 5V pin. Then, we can upload the code over USB to the Arduino without being bothered by the Nextion. Afterwards, we just connect the Nextion’s TX wire (blue) to the Arduino’s RX pin 0. Some Arduino’s will require now another power cycle (unplug and re-plug USB) to initialize the serial port correctly, then, every button press or release on the Nextion’s screen gives an output on the serial monitor of the Arduino IDE. Do not connect the Nextion’s RX (the yellow wire) to avoid that all the messages sent to the serial monitor will flood the Nextion’s input buffer in parallel, causing errors. 😉
Finally, here now the .hmi and .ino files to play with:
3buttons_full_event.HMI
nex_simple_event_handler.ino
Thank you for reading and happy Nextioning!
Questions, comments, critics, suggestions? Just send me an email to thierry (at) itead (dot) cc! 🙂
And, by the way, if you like what I write, and you are about to order Nextion stuff with Itead, please use my referral link! To you, it won’t make a change for your order. But it will pay me the one or the other beer or coffee. And that will motivate me to write more interesting blogs 😉


