The Nextion status bar – advanced programming

The idea…
…which I had in mind was to create a status bar which would – similar to the menu bar of macOS or the task bar of Win10/11 – give some basic general information. the desired specifications were:
– Not eating too much screen estate, thus I opted for a 16px font and a 20px overall height
– Not eating much RAM, thus this status bar is drawn with GUI commands, without any visible components
– Adapting itself to the screen orientation and width
– Show the date/time (without seconds to eliminate too frequent timer interrupts) in the right half of the bar and right justified
– Show some user defined info in the left half of the bar, left justified. For the demo, I choose the baud rate and the brightness, but feel free to tinker your own stuff instead!
Some implementation details and constraints
– To make it really universal, all the displayed content should fit into the smallest dimension which is the width of a vertical 2.4″ or 2.8″ Nextion HMI – 240px, which limits each half to 120px. If you are sure to only use a display with higher resolution or only in horizontal mode, you may naturally adapt the code accordingly. Take this as an example.
– Initially, I planned to develop this as a self-containing page template, but I found that I could save some RAM and make things easier to maintain using 4 global integer variables declared in the program.s tab. So, take a copy of this demo HMI as the base for your development, and duplicate page0 for each page in your project which shall show the status bar before customizing these and adding your components and code. You may naturally delete the explaining Text component t0, beforehand.
– To not slow down your custom code when a page is running, the status bar and the rather static information in the left half are only drawn once, during the Page PostInitialize event, when a page is loaded. Do not place any components in the top 20px of the page, so that nothing will draw over our status bar.
– The date/time in the right half is only updated once a minute. But setting the timer interval to 60000 ms would make that the date and time is only displayed one minute after the page has been loaded, which is not acceptable. Thus, the timer interval is set by default to 1000 ms and it modifies itself to 60000 after the first run.
– For the symbols like the double arrow preceding the baud rate or the sun preceding the brightness, I did NOT use picture resources to further save some RAM. Each 20 x 15 px picture would eat 600 bytes which I found to be unacceptable. I decided thus to use the font tool to create a specific font resource for the status bar, using utf-8 encoding but only including the required characters which are the numbers from 0 to 9, the time and date separators – and /, the % and the ☼ for the brightness, and finally the ↔︎ for the baud rate. This gives a zi font file with a size of only 423 bytes. 777 bytes saved, compared to two pictures with 600 byte each…
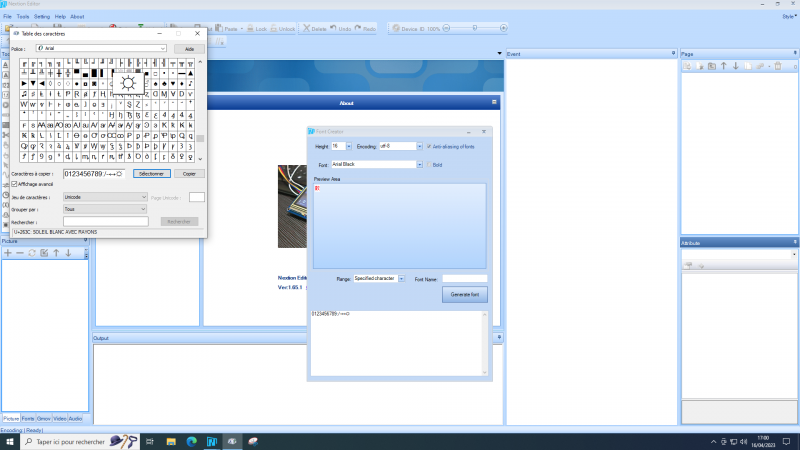
How to create a font with a limited custom character set?
Open the font tool. Choose he height (16px), the encoding (utf-8), the font (Arial Black) and set the Range to “Specified character”. Now, open the Windows character map (charmap.exe), select all the unicode characters you need with double click on each, and click on “Copy”. Then paste this string in the lower pane of the font tool before you enter a font name and click on “Generate font”. That’s it.
Now to the global variables
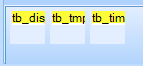
4 global integers are defined in program.s: The height tb_h, the foreground tb_pco and the background color tb_bco of the status bar, and a cursor variable tb_dx. The cursor variable is needed to simplify consecutive positioning of the different elements in the status bar. After each element drawn with the xstr command, it is incremented by the width of the just drawn content and holts thus the starting x-coordinate of the next element. And thats’ how our program.s looks now (the status bar additions in bold):
//The following code is only run once when power on, and is generally used for global variable definition and power on initialization data
int sys0=0,sys1=0,sys2=0     //At present, the definition of global variable only supports 4-byte signed integer (int), and other types of global quantity declaration are not supported. If you want to use string type, you can use variable control in the page to implement
//Everything for the status bar:
int tb_h=20 // height
int tb_bco=0 // black background
int tb_pco=65535 // white characters
int tb_dx // cursor emulation
//End taskbar
baud=115200//Configure baudrate
dim=100//Configure backlight
recmod=0//Serial data parsing mode:0-Passive mode;1-Active mode
printh 00 00 00 ff ff ff 88 ff ff ff//Output power on information to serial port
page 0                       //Power on start page 0
And the local ones
Besides the aforementioned integer variables, we need also two string variables into which we either convert numbers like the baud rate or the brightness directly with the covx command into tb_disp, or we convert consecutively the RTC registers into tb_tmp before assembling the values with the corresponding separators into a full date-time string in tb_disp.
Another local element on each page is a timer tb_timer which takes care of the continuous date and time update. If you are using a HMI display from the Basic or Discovery series (both have no RTC), simply delete the timer before duplicating the page. This will take off all the date and time stuff without affecting the status display in the left half!
The Page Postinitialize code
This should be pretty self-explaining. First, the fill command is used to draw a filled rectangle from (0,0) with the current page width, the height defined in tb_h, and the color set in tb_pco. Then, xstr is invoked a first time to write the “↔” at position 0, then the cursor tb_dx is set to the width of this before the baud variable is converted to text with covx and also written out with xstr. The cursor is moved on again, before the same happens with the “☼” symbol and the value of the dim variable, this time with addition of a “%”. With this, the full background and the static information in the left half are done.
fill 0,0,b[0].w,tb_h,tb_bco // draw the tb background with page width
tb_dx=0 // start leftmost
xstr tb_dx,0,15,tb_h,0,tb_pco,tb_bco,1,1,1,"↔"
tb_dx+=15
covx baud,tb_disp.txt,0,0
xstr tb_dx,0,50,tb_h,0,tb_pco,tb_bco,0,1,1,tb_disp.txt
tb_dx+=50
xstr tb_dx,0,15,tb_h,0,tb_pco,tb_bco,1,1,1,"☼"
tb_dx+=15
covx dim,tb_disp.txt,0,0
tb_disp.txt+="%"
xstr tb_dx,0,40,tb_h,0,tb_pco,tb_bco,0,1,1,tb_disp.txt
The timer code
Here, the year in rtc0 is converted directly into tb_disp while rtc1 to rtc4 are consecutively converted into tb_tmp before being added, together with the appropriate separators. Then, the whole date-time string is written out at once. Finally, the timer checks itself if it is still on the short initialization interval and will, if needed, correct itself to the minute interval.
tb_dx=b[0].w/2 // right half of the status bar
// Assemble the date-time string
covx rtc0,tb_disp.txt,4,0 // year
covx rtc1,tb_tmp.txt,2,0 // month
tb_disp.txt+="-"
tb_disp.txt+=tb_tmp.txt
covx rtc2,tb_tmp.txt,2,0 // day
tb_disp.txt+="-"
tb_disp.txt+=tb_tmp.txt
covx rtc3,tb_tmp.txt,2,0 // hour
tb_disp.txt+=" "
tb_disp.txt+=tb_tmp.txt
covx rtc4,tb_tmp.txt,2,0 // minute
tb_disp.txt+=":"
tb_disp.txt+=tb_tmp.txt
// Update the display
xstr tb_dx,0,tb_dx,tb_h,0,tb_pco,tb_bco,2,1,1,tb_disp.txt
// Take off the startup second interval
if(tb_timer.tim!=60000)
{
  tb_timer.tim=60000
}
All the pages of your project
Don’t forget to leave the upper 20px free, everything there will be filled only by code!
As always, here is the full .hmi file including all the resources, so that you can study and play with or even adapt and re-use it in your own projects: taskbar.HMI
In one of my next articles, we’ll try to add an (almost) automatically generated navigation menu – stay tuned!
Thank you for reading and happy Nextioning!
Questions, comments, critics, suggestions? Just send me an email to thierry (at) itead (dot) cc! 🙂


