Nextion HMI with ESP32 WiFi
Part 1: The WiFi configuration
Recently, when playing with a ESP32 based NodeMCU 32S and especially with its WiFi configuration, I did as (I guess) everybody does: I loaded an example sketch to learn more about the Wifi library. When you set up the ESP32 as an access point, creating its own wireless network, everything is pretty straightforward. You can easily hard code the Wifi name (SSID) and the password. But what about the client mode ? Perhaps one needs to use it in different environments. And then, a hard coded network name and password are definitively not the best solution. Thus, I thought, why not use a Nextion HMI for a dynamic WiFi setup functionality?
And here we are… Since this requires coding on the Nextion side AND on the ESP32 side, this risks to become a little more complex project and I decided to split it up into 2 or 3 parts. But first of all:
The strategic thoughts
Having the Nextion working together with an external MCU requires to take two decisions: First, which device does what? And second, how should the two devices communicate together?
My decision was to set the WiFi config parameters (logically) inside the Nextion in global variables, so that these are not only available on the setup page, and to send just a notification when one presses “Save” on the Nextion with the one-liner get “s”. The ESP32, upon receiving this “s” will then request the 3 global variables setup.mode, setup.ssid, and setup.pwd. And setup its WiFi module accordingly. The setup.mode is a numeric variable which will be 0 for “Off”, 1 for the client mode (login into an existing wireless network), and 2 for the access point mode (the ESP32 creates its own, independent network).
As soon as the ESP32’s Wifi will be up and running then, it will set the global variable setup.ip which will allow us in a later step to have a connect page, showing QR-codes, one for connecting to the WiFi network, and a second to connect to the ESP32 web server’s default page. In the last part of this article series, we will use that to control some of the Nextion’s functions over a browser, be it on a PC or a cell phone.
But one step after the other…
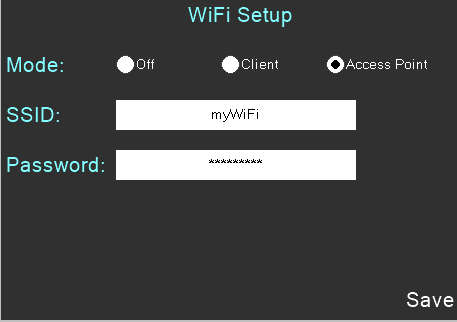
The Setup page
As you can see in the picture above, the setup page is relatively simple. The text components for the SSID and the password are linked to the built-in alphanumeric screen keyboard, thus these have to be global by default. The only tricky thing is the radio buttons for the mode: Normally, these behave like individual dual state buttons, which means that clicking one will toggle it on or off, depending on its previous state, and it will leave the others unaffected. That’s not the behavior which we want. We want a radio button which is off going on when clicked and all the others going off. And clicking one which is already on should make no change.
This is achieved by a TouchCap component, which captures all the clicks before they are notified to the underlying component. A first if() clause will have the further code only executed when one of the the three radio buttons is clicked, and not interfere with clicks on other components. Then, it will loop over all three radio buttons and set all to off (.val=0) but the one which was clicked. The latter will be set to on (.val=1). At the same time, the global setup.mode variable will be set accordingly.
Thus, the event code for the touch component is also short and efficient to handle all three radio buttons at once:
// filter only on radio buttons:
if(tc0.val>=r0.id&&tc0.val<=r2.id)
{
  for(sys0=r0.id;sys0<=r2.id;sys0++)
  {
    if(b[sys0].id==tc0.val&&b[sys0].val!=1)
    {
      setup.mode.val=b[sys0].id-r0.id
    }else
    {
      b[sys0].val=0
    }
  }
}
And the “Save” button has the aforementioned one-liner:
get "s"
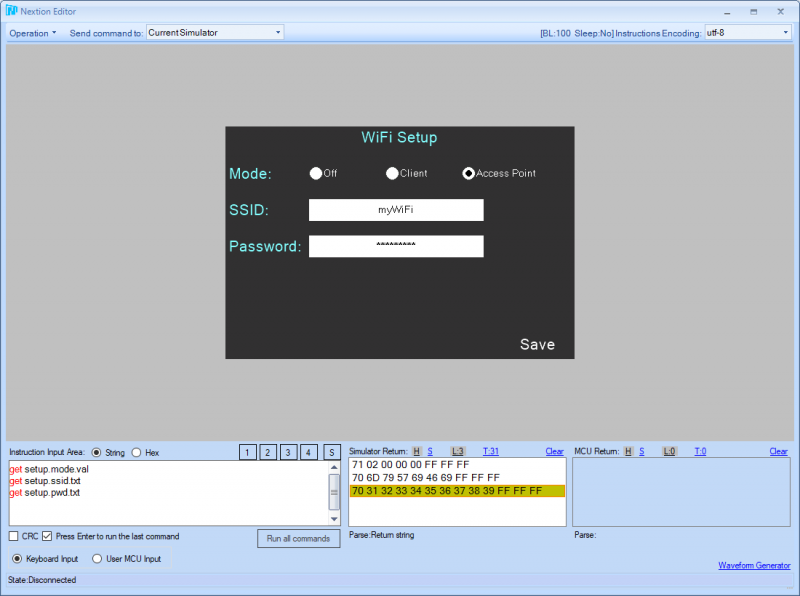
The ESP32 side
On the ESP32 side, we will have to capture the incoming “s” over Serial and then request the 3 global variables to set everything up. That will be the topic of next week’s article. But as you can see in the picture below, we can already check everything out in the simulator and retrieve the mode (2), the network name (“myWiFi”), and the password (“123456789”). Thus, this step is accomplished and tested and we may move on next week.
For those who want to play already with that (yet incomplete) HMI file, here it is: esp32wifi.HMI
Happy Nextioning!


