The Sunday Blog: Text and Numbers

Let the Arduino receive Nextion returns
There are many occasions for the Nextion HMI to send numeric or text return data to your MCU, be it an Arduino, a Teensy, a STM, an ESP, you name it. We may send a get command to request values, text, or other attributes from a HMI component. We may also integrate such get commands in our Nextion code, so that the connected MCU may be surprised by arriving data. This is the last big missing part of the ever but slowly growing NextionX library. But before we integrate and use a library function, we should fully understand what happens behind the scenes. Thats why today, we’ll see a small project, comprising a HMI part and an Arduino sketch part, to (hopefully) understand better all the details. At the same time, we’ll need to discuss different forms of text storage in embedded processors.
A little bit of technical discussion before: String or char array?
Char arrays have to have a known size in advance while a String object can be re-dimensioned at runtime, concatenating text with char arrays needs specific commands while String objects can simply be added. These are only two examples of a very long pro and contra list. In the Arduino world, often hobbyists who don’t want to care about buffers and pointers, the String object is naturally more prominent, because of the easy handling. But the heavy use of String objects can make the memory organization of your Arduino look like a Swiss cheese and lead to instability.
Let’s take a simple (and simplified) example: Let’s declare String myStr=”Hello”; then int i=4711;
The compiler will reserve 6 bytes for myStr (5 for the 5 letters of “Hello” plus a NULL byte terminator as in a “classic” char array). Afterwards, it will reserve 2 bytes for our integer i. So far so good. Later in code, we’ll write myStr+=” world”. This makes that the reserved (and planned) 6 bytes are not longer sufficient, because now, 12 bytes are needed. Since the planned space for our int i is in the way, the compiler has no choice but to abandon the first 6 bytes and to place the new and bigger version of myStr behind int i. So, we started with 8 bytes (which corresponds to the memory usage output at compile time), and now, we are already at 20 bytes (6 abandoned, 2 for int i, and 12 for the new myStr). Repeat the procedure a few times in a more complex program with more variables, and you risk to hit the memory limit at runtime, probably causing your program to crash. And that although the compiler told you that only 40% of the available RAM was used when you compiled and uploaded your sketch.
On MCUs with a small RAM, using String objects is thus a no-no. The “hassle” of thoughtful defining char array sizes in advance and a slightly more complex syntax for string manipulation is worth it.
Now to the Nextion return data
Let’s assume, the Nextion sends the following 8 bytes to the Arduino: 0x71 0xA1 0xB0 0xB9 0x12 0xFF 0xFF 0xFF. Before we look in detail at these bytes, we have to read them from the Serial port and to save them in a buffer. Then, let’s look at the first byte. It’s 0x71 which indicates that the following 4 bytes represent a 32bit integer, while the last three bytes form the well-known terminator.
If the first byte is not 0x71 but 0x70, we know that a text with variable length will follow.
Our loop() has thus to check if there are bytes waiting to be read. If yes, read and copy these consecutively into a buffer. The buffer must be large enough to store the whole message, the final 3 0xFF bytes including. As we can see above, a 8 bit wide buffer would be sufficient for numeric return values, but it will most probably have to be much larger to receive a longer text. To protect from buffer overflow, we should check before inserting a byte if there is still enough space left for at least the 3 terminator bytes, if not drop the current byte. Better cut the end of an incoming long text than have your code write beyond the buffer boundaries and causing a program malfunction or crash!
Then, after each byte, we must check if the last 3 bytes are all 0xFFs. If yes, the transmission is ready and we may process the input.
So, our loop starts with:
void loop() {
  if (Serial1.available()) {
    rxByte = Serial1.read();
    if (rxByte == 0xFF || rxPtr < NEX_RXPTR_WARN) {
      rxBuf[rxPtr++] = rxByte; // add the byte to the buffer only if there is enough space left
    }
    if ((*(uint32_t*)(rxBuf + rxPtr - 4) & 0xFFFFFF00) == 0xFFFFFF00) { // check for 3x0xFF
Then, after having received the 3 FFs, we might look at the very first byte to check if it’s 0x71 or 0x70 and extract either the number or the text and print it out to the serial monitor. Finally, we reset the buffer to be ready for the next transmission:
      if (rxBuf[0] == 0x71)
      {
        rxVal = (int32_t)(((int32_t)rxBuf[4] * 256 + rxBuf[3]) * 256 + rxBuf[2]) * 256 + rxBuf[1];
        Serial.println(rxVal);
      } else {
        rxBuf[rxPtr - 3] = 0x00; //change the Nextion terminator into a c_string terminator
        rxTxt = (char*)rxBuf + 1; //take the buffer from the 2nd byte to eliminate the 0x70
        Serial.println(rxTxt);
      }
      Serial.println("***");
      rxPtr = 0;
    }
  }
}
Beforehand, we need naturally to declare all our variables and to run setup() to initialize the serial ports:
#define NEX_RXBUF_SIZE 256
#define NEX_RXPTR_WARN (NEX_RXBUF_SIZE-3)

uint8_t rxByte;
uint8_t rxPtr = 0;
uint8_t rxBuf[NEX_RXBUF_SIZE] = {0};
int32_t rxVal;
char* rxTxt;

void setup() {
  Serial.begin(9600);
  while (!Serial);
  Serial1.begin(9600);
  while (!Serial1);
}
That’s it on the Arduino (Mega) side. 37 lines of formatted code and we are done with our example. The complete sketch is available here: blog_210321.ino
And the Nextion side
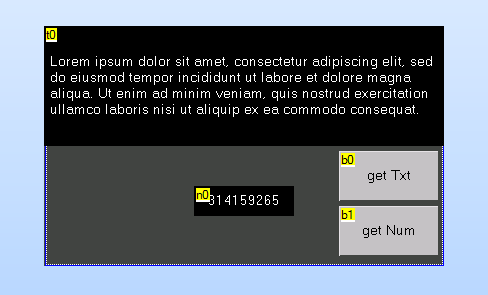
I’ve prepared a little HMI file, containing one page with a text component which is preloaded with Lorem ipsum text, a number component containing a large integer, and two buttons which have the corresponding get commands in their Touch press event code to transmit either the text or the number to the Arduino:
The HMI file is available here: blog_210321.HMI
Now, if you connect the Nextion’s TX (blue cable) to the Mega’s RX1 (pin19) and you press the screen buttons while the sketch is running, you should get the following output in the serial monitor:
Lorem ipsum dolor sit amet, consectetur adipiscing elit, sed
do eiusmod tempor incididunt ut labore et dolore magna
aliqua. Ut enim ad minim veniam, quis nostrud exercitation
ullamco laboris nisi ut aliquip ex ea commodo consequat.
***
314159265
***
Finally, you may play with this sketch. For example, reduce the buffer size and check if and how the text is truncated. Or take parts of this code and adapt it to your own needs.
Thank you for reading!


