The Sunday Blog
The alternative NextionX library does now listen to your Nextion HMI
First of all: A happy and healthy Chinese New Year to all our readers! Then, as stated a few weeks ago, when the very first release of the NextionX library was published here, it is not intended to be in concurrence with the official Nextion library for Arduino. It is rather intended as a pedagogic project:
- Compact and easily understandable fully object oriented code (~263 lines) so that everybody might see how things work “under the hood”
- Ability to handle multiple Nextion HMIs connected to a single MCU (with enough serial ports)
- Simple and easy to use – no need for fiddling with defines(#), references (&), pointers(*) and template parameters (<>) for example
- “Automatic” handling of the listener list of components to react on Touch and Release events
What has evolved?
The NexComm object
Remember the first release ? The (internal) declaration of the NexComm object was extremely tricky since its object type varied with the use of different types of serial ports (Hardware, Software, USB). That’s while the initComm() function macro was needed to get around that. All that is not longer needed. A NexComm object – you need one for each connected HMI – is now declared and instantiated with a simple NexComm Nex1;. When you needed debug messages over another serial port, you had to create a NexCommDbg object instead. Not longer needed.
Without debugging, the NexComm object is now initialized in the setup() part of your sketch by calling NexComm.begin(port, baud_rate);. If you omit the baud rate, it will default to 9600 as before. On an Arduino UNO, you’d perhaps use the hardware serial port on pins 0 and 1 at default speed: Nex1.begin(Serial); while on a Mega, you’d rather use pins 18 and 19 to keep the default serial port free for debugging with the Arduino serial monitor: Nex1.begin(Serial1); – that’s it.
Since debugging is normally only required while developing and testing, you may then add a single line NexComm.addDebug(port, baud_rate); and simply comment it out or remove it, later. If a debugging port is needed on a UNO, you’d rather use the SoftwareSerial library to create an additional port for your Nextion HMI and use the default Serial for debugging.
Example for Arduino Uno with debugging:
#include <SoftwareSerial.h>
#include <NextionX.h>

SoftwareSerial softSer(2,3);

NexComm myNex;

void setup() {
  myNex.begin(softSer);
  myNex.addDebug(Serial);
}
Example for Arduino Mega with debugging:
#include <NextionX.h>

NexComm myNex;

void setup() {
  myNex.begin(Serial1);
  myNex.addDebug(Serial);
}
Besides of that, the usage of the NexComm object and its .cmdWrite(command_string); method has not changed. But to handle incoming messages from the Nextion HMI, it has got a new method .loop(); which has to be placed at the beginning of the main loop():
void loop() {
  myNex.loop();
}
The NexComp object
There is not longer a different NexComp object type for each NexComm object type. A NexComp object is now simply declared, instantiated and initialized on a single line: NexComp component_name(NexComm_object, page_id, object_id); as in the following example. You can choose the component_name at your convenience and it has not to mach with its HMI name. The communication between MCU and Nextion is only based on the page and object id values:
NexComm myNex;
NexComp versionText(myNex, 0, 1);
NexComp momButton(myNex, 0, 2);
NexComp togButton(myNex, 0, 4);
Please remember to only declare the GUI components which need to interact with your MCU, in order to save memory!
If you want some action (function call) when a component is pressed or released, you may simply declare these functions first, before setup(), and then “attach” these to the component in setup(). No need to have a NexListenList or whatever. Each NexComm object handles the list of its attached components automatically: As soon as you call one of the two methods NexComp.setOnTouch(function) or NexComp.setOnRelease(function), it will automatically be registered in the internal listen list if it hasn’t yet already been registered before. As a compromise between flexibility and memory usage, the list is actually limited to 16 components per NexComm object in form of a ring buffer: As soon as you add a 17th or 18th component for event listening, it will deactivate by overwriting the first and second one which were previously declared. This approach allows to add (and indirectly to remove) components to and from the listener list at runtime, for example after a page change. For more detailed information about this, please refer to the readme.md file of the library.
The .setAttr(attribute_name, attribute_value) method is unchanged since v0.5.0.
Here an example of a complete setup() of an Arduino Sketch to show the usage of the new methods:
void setup() {
  myNex.begin(softSer);
  myNex.addDebug(Serial);
  pinMode(13,OUTPUT);
  versionText.setAttr("txt", "v.0.7.0");
  momButton.setOnTouch(LED_on);
  momButton.setOnRelease(LED_off);
  togButton.setOnTouch(LED_tog);
}
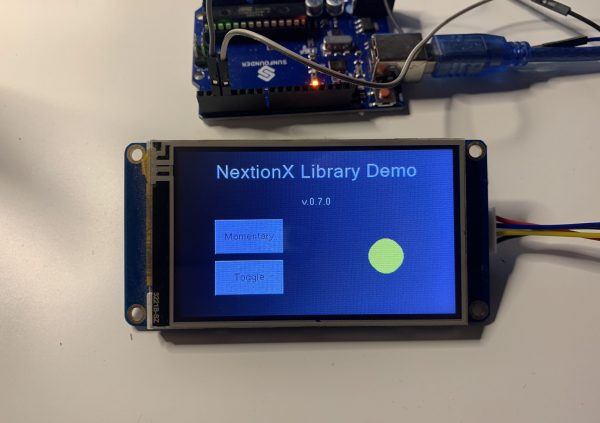
Today’s example project
You have already seen parts of it in the example snippets above. What we’ll still need is a .hmi file which has a text field to show the version number, two simple buttons which our library will listen to and use them to switch the LED of our Arduino on and off, one as a momentary switch (LED on on press, LED off on release), and one as a toggle switch which changes the state of the LED at each press, and finally some free space to mirror the LED state with an illuminated circle in the GUI. No Nextion code is required. Everything is handled by the MCU. Download the .hmi file here: XlibDemo070.hmi
And don’t forget to go on the library’s GitHub page to download and install the newest release!
The example sketch uses an Arduino UNO with debugging over Serial and the Nextion connected via SoftwareSerial on pins 2 and 3. If you have a MEGA or any other MCU with more hardware serial ports, adapt the sketch according to the examples above and be happy about more free memory!
The entire sketch consists of 4 parts. The first is the declaration part:
#include <SoftwareSerial.h>
#include <NextionX.h>

SoftwareSerial softSer(2,3);

NexComm myNex;
NexComp versionText(myNex, 0, 1);
NexComp momButton(myNex, 0, 2);
NexComp togButton(myNex, 0, 4);
Then, we need to define 3 functions to switch the built-in LED on and off and to toggle its state:
void LED_on()
{
    digitalWrite(LED_BUILTIN,HIGH);
    myNex.cmdWrite("cirs 300,155,25,65504");
}
void LED_off()
{
    digitalWrite(LED_BUILTIN,LOW);
    myNex.cmdWrite("cirs 300,155,25,12678");
}
void LED_tog()
{

  if(digitalRead(LED_BUILTIN))
  {
    LED_off();
  } else
  {
    LED_on();
  }
}
Now, the setup() part:
void setup() {
  myNex.begin(softSer);
  // Comment the next line out to disable debugging and to free up memory:
  myNex.addDebug(Serial);
  pinMode(13,OUTPUT);
  versionText.setAttr("txt", "v.0.7.0");
  momButton.setOnTouch(LED_on);
  momButton.setOnRelease(LED_off);
  togButton.setOnTouch(LED_tog);
}
And finally, the loop():
void loop() {
  myNex.loop();
}
That’s it. Instead of re-typing the sketch, you may download it here: libdemo_070.ino
With debug activated, the serial monitor of the Arduino IDE will tell you exactly what happens all the time. I’ve manually added comments behind the returns:
bkcmd=3 // The library requests detailed return data on each action from the Nextion
Success // Seems ok for the Nextion
p[0].b[1].txt="v.0.7.0" // The library sets the version text field
Success // Still ok for the Nextion
Touch Press on page 0 obj 2 // The "Momentary" button was pressed
cirs 300,155,25,65504 // The callback function via the library requests the drawing of a filled yellow circle (on)
Success // Ok for the Nextion
Touch Release on page 0 obj 2 // The "Momentary" button was released
cirs 300,155,25,12678 // The callback function via the library requests the over-drawing with a filled background color circle (off)
Success // Ok for the Nextion
Touch Press on page 0 obj 4 // The "Toggle" button was pressed
cirs 300,155,25,65504 // The callback function via the library requests the drawing of a filled yellow circle (on)
Success // Ok for the Nextion
Touch Release on page 0 obj 4 // The "Toggle" button was released - no action requested
Touch Press on page 0 obj 4 // The "Toggle" button was pressed again
cirs 300,155,25,12678 // The callback function via the library requests the over-drawing with a filled background color circle (off)
Success // Ok for the Nextion
Touch Release on page 0 obj 4 // The "Toggle" button was released - no action requested
If everything works as expected, the virtual LED on the GUI and the built-in LED of your Arduino should go on and off synchronously when you use the “Momentary” and “Toggle” buttons on the Nextion screen. Have fun playing around with GUI components and callback functions! If you find issues in the library, don’t hesitate to report these on GitHub.
Thank you for reading!