The Nextion HMI menu – dynamically extended
Introduction
After adding a toolbar (this article) and a static menu (this article) to our Nextion HMI, we will add an extension to the latter, today. While it is convenient, not too difficult and, thanks to some of the developer’s efforts, not very resource consuming to have a common menu, which means it being identical for all pages, the one or the other application would perhaps be more ergonomic if we hadn’t all menu items available on all pages…
Thus, having foreseen that, I’ll give you the choice today. We’ll add a few lines of code to our project and especially another single global text variable to the menu page. This will give us the option to keep all common menu items in the menu page’s cfg_menu variable. AND we’ll have the option to add individual menu items for each page.
And how?
While the scope of cfg_menu is local and will be reinitialized with its default text each time the menu page is loaded, the newly added cfg_add variable is global and can be set by the calling page. When the menu is loaded, it will use the strlen function to check if there is something in cfg_add and, if yes, add a new line (“\r”) followed by the text in cfg_add to cfg_menu. From then on, the menu page works as last week, it renders all menu items and handles the touch events without any further code modification. Isn’t that convenient?
The menu page’s postInitialize event code looks now like that:
// let's check if there is a menu addition from the calling page
strlen cfg_add.txt,tmp2.val
// if yes, append it to the common menu configuration
if(tmp2.val>0)
{
  cfg_menu.txt+="\r"
  cfg_menu.txt+=cfg_add.txt
}
// *** from here, it's the same as last week ***
...
Now, we need still to tell the menu if and which menu items are to be individually added from the calling page. This will be done in the event code of the hotspot m0 which is in the top right corner of each page and which calls the menu. The newly added lines (functionality and comments which I omitted last week) are printed in bold, so that you can easily see the difference:
// configure the return page
menu.call_page.val=dp
// optional: add individual menu items
menu.cfg_add.txt=""
// call the menu
page menu
Basically, besides the explaining comments, one single additional line does the job. But, what to put into menu.cfg_add.txt ? As you might remember from last week, the structure was one line per item as multiline text, thus multiple items are separated by a “\r”. Each item or line consists of two elements, the id of the page to which the menu click shall lead, and the corresponding text to be displayed, both separated by a semicolon.
An example tells more than 1000 words, thus, let’s look at…
The demo project
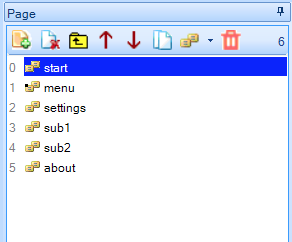
This week’s demo project is a only slightly modified version of last week’s one. Remember, there were 5 normal example pages (“Start”, “North”, “East”, “South”, and “West”) which were all accessible through the common menu, and a sixth page, the menu overlay page.
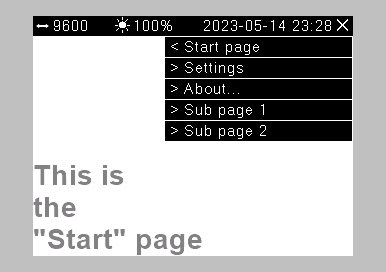
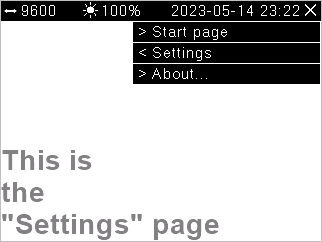
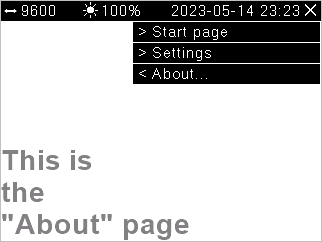
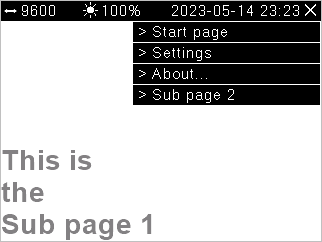
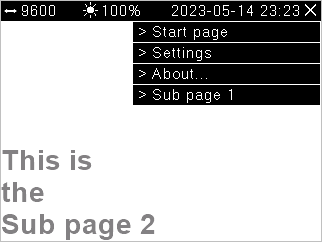
Now, this has changed a bit. We have still the same number of pages, but these are now named differently, since we want to better organize our menu: There are 3 pages which shall always be accessible from everywhere through the common menu (“Start”, “Settings”, and “About”), and 2 pages with lower priority (“Sub 1” and “Sub 2”) which shall only be displayed in the start page’s menu. In addition, “Sub 2” shall appear in the menu of the “Sub 1” page, and vice versa.
Let’s look at this in practice, here the page pane:
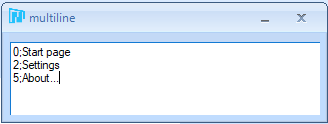
As said above, the Start, Settings and About pages with the respective IDs 0, 2, and 5 have to be always accessible, thus, they go in the common configuration, the cfg_menu variable of the menu page:
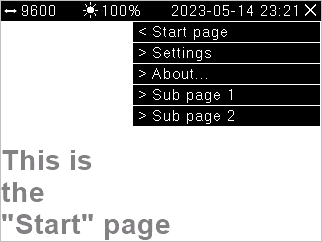
Now, we want the Start page’s menu to show Sub 1 and Sub 2 in addition, thus, we modify the code of the Start page’s hotspot m0 as follows:
// configure the return page
menu.call_page.val=dp
// optional: add individual menu items
menu.cfg_add.txt="3;Sub page 1\r4;Sub page 2"
// call the menu
page menu
The menu of the Sub 1 page shall only contain an additional link to the Sub 2 page, thus, the hotspot m0 will have the following event code:
// configure the return page
menu.call_page.val=dp
// optional: add individual menu items
menu.cfg_add.txt="4;Sub page 2"
// call the menu
page menu
And, in a similar way, on page Sub 2, we want to add page Sub 1 to the menu:
// configure the return page
menu.call_page.val=dp
// optional: add individual menu items
menu.cfg_add.txt="3;Sub page 1"
// call the menu
page menu
On all other pages, there are no items added, this is done with the default variant where menu.cfg_add.txt=”” as shown above.
Here the different pages and how their individual menus look, now:
And that’s it. You even don’t need to copy/paste all the little code additions, here is the new demo .hmi file for you, to study it, to experiment with it, and you are explicitly invited to re-use everything in your own projects: add_menu_ext.HMI
Following the suggestion from some readers, next time we will add an optional “filter”, so that the calling page will not longer have to be displayed as a menu item, even if listed in cfg_menu. That is not trivial since then, the ordinal number of a “clicked” menu item will not longer correspond to the ordinal line number in our pseudo csv data structure, but I bet we’ll get this with a very few lines of code!
Thank you for reading and happy Nextioning!
Questions, comments, critics, suggestions? Just send me an email to thierry (at) itead (dot) cc! 🙂


