Using the Nextion MIDI I/O interface with an Arduino
Without a Nextion HMI…
Although the Nextion MIDI I/O interface has been primarily designed as an add-on for Nextion HMI screens to transform these in fully autonomous MIDI devices as shown in previous blog posts here, it is also of great use for any Arduino based electronic music project!
Many MIDI projects for Arduino suffer from a lack good hardware support. There are sophisticated code, excellent libraries and an infinity of use cases, but afterwards, things tend not to work in a rather rough environment in the studio or on stage. That’s because two resistors and a few Dupont wires on a breadboard besides the Arduino are not really an interface which could drive your Synth, Sequencer, or Drum machine over a 5m long MIDI cable.
Some makers sell handcrafted MIDI interfaces from $20 on platforms like Etsy, but often, these are only one-way and they haven’t all the driving and filtering capabilities which are required in environments with a high density of electronic devices and where hum and noise invite themselves through electromagnetic and electrostatic interference.
Under these aspects, the Nextion MIDI I/O interface is designed to “midify” your Arduino in a 100% compliant way. Besides two-way communication (MIDI IN and MIDI out) at the same time, it has passive filtering and active drivers in both paths to ensure best signal quality even in difficult conditions and with long cables, and it protects your Arduino, PIC, Teensy or whatever MCU you use from dangerous voltage spikes.
Interface details first
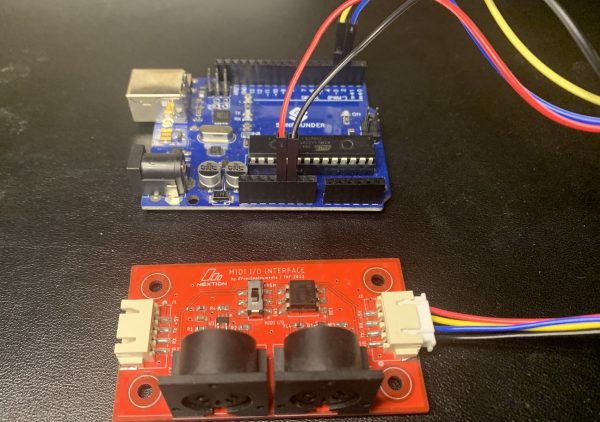
When we have a look onto the Nextion MIDI I/O interface, we discover 5 important elements: The MIDI IN and MIDI out connectors, the power supply and data connectors, and the mode switch. The J1 connector and the mode with in position “PRGM” are mainly of interest when using the interface with a Nextion HMI.
For use with Arduino and compatible MCUs, we set SW1 to “MIDI I/O” and we use the connector J2 whose TX and RX lines are then routed to the MIDI IN and OUT ports as seen in the hook-up diagrams below. And you’ll see, it’s pretty straightforward!
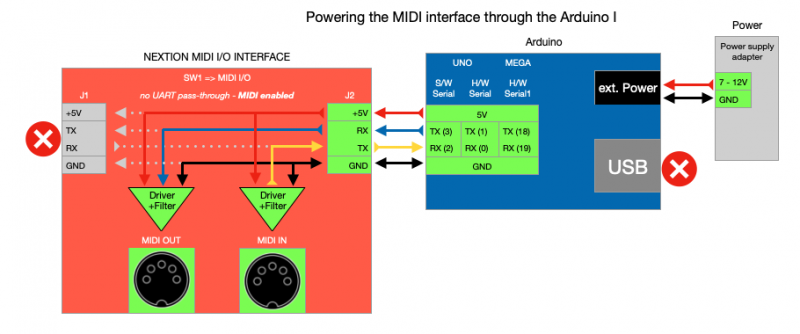
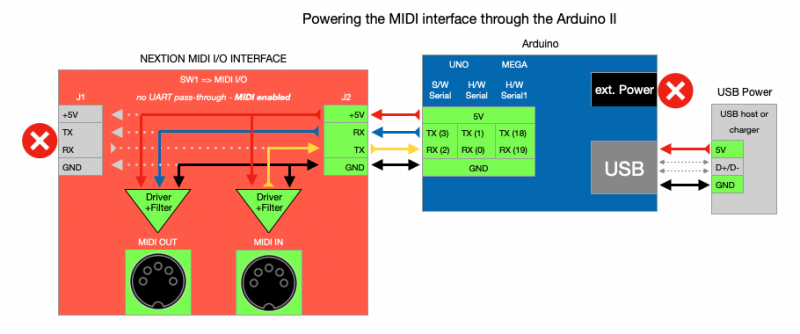
Different ways to power everything
The Nextion MIDI I/O interface needs to be powered with 5V supply voltage, its maximum (peak) current consumption is around 20mA, thus we may use the 5V pin of the Arduino (which is either powered from 7-12V on its PS connector or from 5V over USB) and get our “juice from there as the next two pictures show it:
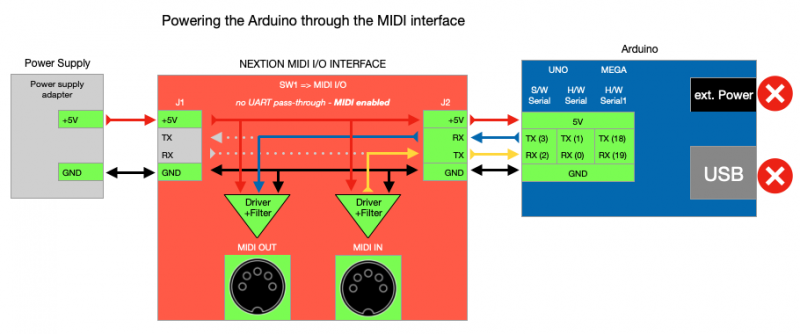
But, if the Arduino and the Nextion MIDI I/O interface are part of a “bigger thing” with a central 5V power supply, it might alternatively be convenient to daisy-chain everything and to “feed” the Arduino through the interface as follows:
The Arduino UNO and its “particularities”
In opposite to most MCUs which are today on the market, the ATMega328p based UNO has no native USB interface and only one serial port. The onboard TTL UART-to-USB converter is connected internally in parallel to the RX and TX pins 0 and 1. This can lead to blocking conflicts when you want to use this port for uploading code, giving out debug messages via the serial monitor of the IDE and sending and receiving MIDI signal at the same time. That’s one of the (rare, I admit) moments to recommend using SoftwareSerial (a second serial port emulated in software and physically realized with GPIO on different pins) for MIDI, especially since the MIDI standard requires a relatively slow baud rate of 31250 bauds which is not too resource consuming.
Test your hook-up with an example sketch
Here is an example sketch which uses SoftwareSerial on pins 3 (TX) and 2(RX) and which makes the Arduino output a MIDI sequence through the interface and a connected MIDI instrument.
#include <SoftwareSerial.h>
SoftwareSerial midiPort (2,3);
byte lastCmd = 0;
void setup() {
 // put your setup code here, to run once:
 midiPort.begin(31250); // set to the standardized MIDI baud rate
}
void playNote(byte note, byte velocity, byte channel = 1) {
 byte cmd = 0x90 | ((channel - 1) & 0x0F); // Sanitize channel value
 if (cmd != lastCmd) {
   midiPort.write(cmd);
   lastCmd = cmd;
 }
 midiPort.write(note & 0x7F); // Sanitize note value
 midiPort.write(velocity & 0x7F); // Sanitize velocity value
}
void loop() {
 // put your main code here, to run repeatedly:
 // Let's play a funny melody
 playNote(72,100); // C5 on (default channel)
 delay(160);
 playNote(72,0); // C5 off
 delay(320); // pause
 playNote(67,100); // G4 on
 delay(160);
 playNote(66,100); // F#4 on
 playNote(67,0); // G4 off
 delay(160);
 playNote(67,100); // G4 on
 playNote(66,0); // F#4 off
 delay(160);
 playNote(68,100); // G#4 on
 playNote(67,0); // G4 off
 delay(480);
 playNote(67,100); // G4 on
 playNote(68,0); // F#4 off
 delay(160);
 playNote(67,0); // G4 off
 delay(320); // pause
 playNote(43,100); // G2 on
 delay(480);
 playNote(43,0); // G2 off
 // Build up a chord:
 playNote(71,64); // B4
 playNote(67,64); // G4
 playNote(65,64); // F4
 playNote(62,64); // D4
 delay(480);
 // Chord off and another one on:
 playNote(71,0);
 playNote(67,0);
 playNote(65,0);
 playNote(62,0);
 playNote(72,64); // C5
 playNote(67,64); // G4
 playNote(64,64); // E4
 playNote(60,64); // C4
 delay(480);
 // Chord off and single note
 playNote(72,0);
 playNote(67,0);
 playNote(64,0);
 playNote(60,0);
 playNote(36,100); // C2 on
 delay(480);
 playNote(36,0); // C2 off
 delay(960); // longer pause
}
You don’t need to retype or copy paste everything, you can download the .ino file here: MIDI_melody.ino
The video with demo and explanations
Thank you for reading, watching and Happy Nextioning!


