Protocols and parsing – Part 4
Receiving and decoding MIDI messages
Over the last weeks, we learned about the Nextion active protocol parse mode in general, about the MIDI protocol in Detail, and we got a first and simple demo project which taught us how the Nextion HMI could send MIDI messages or commands in standalone mode. Today, things become a little more complex: We want to receive and to decode MIDI messages and commands. For this demo project, we’ll implement two functionalities: Soft-through, which means that received, decoded and validated commands are then re-sent, and a MIDI monitor which should show us the MIDI data stream in a human readable form. Afterwards, it might be up to you to to add other functions like GPIO triggers or visual effects, or even filtering, transforming, and re-sending the midi data for additional effects like transposition or adding sub-harmonics (octavider) or a second instrument, mirroring the data onto another midi channel, based on this framework.
Although all this remains a dry run exercise for the moment, since the Nextion MIDI I/O Interface is still in the works, it’s most probably the right moment to familiarize with all this, so that you can start selling your Nextion MIDI controller and processor projects as soon as the board will be available.
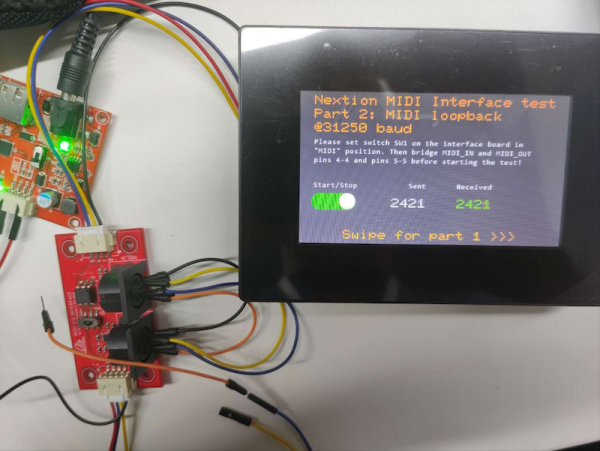
Off topic: We are progressing on bringing the Nextion MIDI I/O interface to you!
The first prototypes have now been built and my Chinese colleagues Daniel and Stan asked me for a simple electrical test procedure before they would ship them over to me for real-life tests in studio or stage conditions, with long cables and much electrical noise from numerous interconnected devices. I thought that it would be nice to have a Nextion HMI running the tests on its future new accessory and I sent them a .tft file for a NX4827P043-011C-Y. As you can see, it does its job very well and it allowed to validate a further step forward:
Back to today’s topic…
There was a big hurdle at the very beginning: How would I constantly monitor the incoming data stream? A while(usize>0) loop would be dealing with every byte as long as there were bytes waiting in the buffer. But what if there were a break in the data stream? The while() loop would exit and never again look for new incoming data. Thus, I thought of using a timer to re-launch the processing periodically. You see it come: The minimum timer interval which you can set in the Nextion IDE is 50ms – ways too long if you don’t want much latency. But there is a workaround: In code, you can set much smaller intervals (keep this hint in mind!). That’s why you find tm0.tim=5 in the PostInitialize event code of page 1.
Now, with an assured quasi-continuous data processing flow, we can look at the details. First, we look at the incoming byte. If its upper half-byte is between 0 and 7, it’s a data byte. If it’s between 8 and E, it’s a channel message. If it’s F, we’ll have to look at the lower half-byte: From 0 to 7, it’s a system message, and from 8 to F a real-time message. So, for channel and system, a new message decoding cycle will be started in ever case. Real time messages are the only messages which have no data bytes, can be interleaved in other messages, and must be processed immediately without disturbing the actual message decoding. There is then some code to detect how many data bytes are expected to follow. Afterwards, we wait for the corresponding number of data bytes to re-assemble internally the full command, before we either re-send it (if soft-through is on), or decode it for displaying it on the monitor, or both.
Any unexpected channel or system message which arrives before the previous message is completed, will discard the incomplete data internally and start over with a fresh decoding cycle. This behavior is identical to the Arduino MIDI library.
What might happen are “unexpected” further data bytes after a full message has been decoded. Remember this article, I wrote about the famous “running state” there. Running state, when activated saves bytes and time during transmission by omitting the repetition of identical status bytes, but only for channel messages. Thus, when more data bytes arrive without a leading status byte, we have to check if running state is active, and if the previous status byte started with a value between 8 and E and was thus a channel message. If the answer to both is “yes”, we re-activate the previous status byte and continue our decoding with the new data byte(s). In all other cases, these extra data bytes are discarded.
That’s basically all for the decoding and you find the translation of the previous four paragraphs into Nextion language in the first half of timer tm0’s event code:
//Check if there is input to be processed
while(usize>0)
{
  status_upper=u[0]&0xF0>>4
  if(status_upper>=8)
  {
    //It's a status byte
    status_lower=u[0]&0x0F
    if(status_upper<15)
    {
      //It's a channel message
      exp_len=3 //default length for channel messages
      if(status_upper==12||status_upper==13)
      {
        exp_len=2 //expect a 2 byte only message
      }
      channel=status_lower+1
      status_keep=u[0] //only channel messages are eligible for running state
    }else
    {
      //It's a system message, but don't change exp_len when it's a real time message
      if(status_lower==0||status_lower==7)
      {
        exp_len=0 //discard variable length SysEx messages for the moment
        //ToDo: add a ram file based SysEx buffer later, perhaps in a separate article
      }else if(status_lower==1||status_lower==3)
      {
        exp_len=2 //expect a 2 byte message
      }else if(status_lower==2)
      {
        exp_len=3 //expect a 3 byte message
      }else if(status_lower==4||status_lower==5)
      {
        exp_len=0 //discard undefined
      }else if(status_lower==6)
      {
        exp_len=1 //expect a 1 byte message
      }else
      {
        rt_byte=u[0]
      }
      status_keep=0 //never apply running state to system messages
    }
    if(rt_byte==0)
    {
      status_byte=u[0] //If there is a real time msg, interleave it but continue decoding the current msg
      rec_len=1
    }
    udelete 1
  }else
  {
    //It's a data byte
    if(rec_len==0&&sw1.val==1&&status_keep>0)
    {
      rec_len=1 //running state is enabled and can be applied
    }
    if(rec_len==1)
    {
      data1_byte=u[0]
    }else if(rec_len==2)
    {
      data2_byte=u[0]
    }
    rec_len++
    udelete 1
  }
  //Now check if the message is valid and handle it
  if(rt_byte>0)
  {
    prints rt_byte,1 //send interleaved real time msg immediately
    if(sw3.val==1)
    {
      //interleave the message to the monitor, too
      spstr sysMesg.txt,newLine.txt,";",status_lower
      newLine.txt+=" ()"
    }
    rt_byte=0
  }
  if(rec_len>0&&rec_len==exp_len)
  {
    if(sw2.val==1)
    {
      prints status_byte,1 //if soft through active, send the decoded message back
      if(rec_len>1)
      {
        prints data1_byte,1
        if(rec_len>2)
        {
          prints data2_byte,1
        }
      }
    }...
Now, the remaining work is to take the decoded and validated message, to use some pseudo-arrays to transform some of the (half-)bytes into human readable text and add it to the monitor as a new line. To prevent overflow, we check if there are already 25 displayed lines and, if yes, we delete the first (oldest) line to free up space for the next one. And that’s the rest of the timer event code:
 ...if(sw3.val==1)
    {
      //Display decoded Msgs in the monitor
      status_upper=status_byte&0xF0>>4
      status_lower=status_byte&0x0F
      if(status_upper>=8&&status_upper<15)
      {
        sys0=status_upper-8
        spstr vocMesg.txt,newLine.txt,";",sys0
        covx channel,tmp.txt,0,0
        newLine.txt=newLine.txt+" ("+tmp.txt+", "
      }else if(status_upper==15)
      {
        spstr sysMesg.txt,newLine.txt,";",status_lower
        newLine.txt=newLine.txt+" ("
      }
      if(rec_len>1)
      {
        if(status_upper>9)
        {
          covx data1_byte,tmp.txt,0,0
          newLine.txt=newLine.txt+tmp.txt
        }else
        {
          //translate the note number in something like "A4"
          note=data1_byte%12
          octave=data1_byte/12-1
          spstr noteNames.txt,tmp.txt,";",note
          newLine.txt+=tmp.txt
          covx octave,tmp.txt,0,0
          newLine.txt+=tmp.txt
        }
        if(rec_len>2)
        {
          covx data2_byte,tmp.txt,0,0
          newLine.txt=newLine.txt+", "+tmp.txt
          if(data2_byte==0&&status_upper==9)
          {
            //add "/Off" to NoteOn messages with velocity=0
            newLine.txt+="/Off"
          }
        }
      }
      newLine.txt+=")"
    }
    rec_len=0 //reset everything
  }
  strlen newLine.txt,sys0
  if(sys0>0)
  {
    spstr mon.txt,tmp.txt,"\r",24
    strlen tmp.txt,sys1
    if(sys1>0)
    {
      //there is already a 25th line, let's delete the first
      spstr mon.txt,tmp.txt,"\r",0
      strlen tmp.txt,sys2
      substr mon.txt,buf.txt,sys2+2,1024
      mon.txt=buf.txt
    }
    mon.txt+="\r"
    mon.txt+=newLine.txt
    ref mon
    newLine.txt=""
  }
}
I must admit, all this monitoring and translating into human readable text is luxury – whistles and bells. But it’s a good exercise to fully understand the MIDI protocol and to handle specific cases. The pure decoding and re-sending part (basically what every midi library does) is less than 100 lines of code, which proves that despite of appearing limited to some users at a first glance, it’s a mighty and efficient programming language!
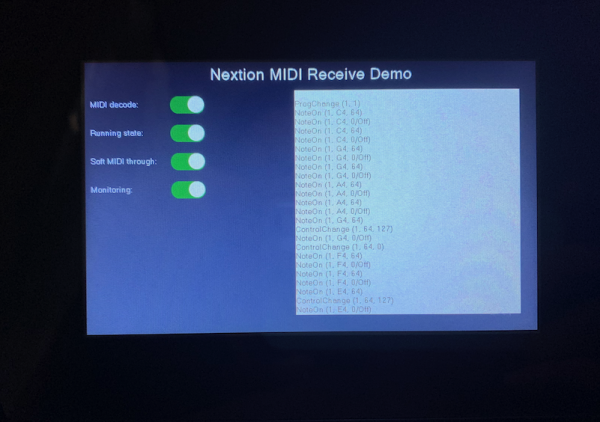
The test scenario which gives the monitor result in the first picture above is me, playing the beginning of the famous alphabet song on my keyboard:
FF        //SysReset()
//*Select Grand Piano
C0 01     //ProgChange(1,1)
90 3C 40  //NoteOn (1, C4, 64)
//*From here on, the keyboard uses running state
//*and omits resending the 90 status byte over and over
3C 00     //NoteOn (1, C4, 0/Off)
3C 40     //NoteOn (1, C4, 64)
3C 00     //NoteOn (1, C4, 0/Off)
43 40     //NoteOn (1, G4, 64)
43 00     //NoteOn (1, G4, 0/Off)
43 40     //NoteOn (1, G4, 64)
43 00     //NoteOn (1, G4, 0/Off)
45 40     //NoteOn (1, A4, 64)
45 00     //NoteOn (1, A4, 0/Off)
45 40     //NoteOn (1, A4, 64)
45 00     //NoteOn (1, A4, 0/Off)
43 40     //NoteOn (1, G4, 64)
//*Press the Sustain pedal
B0 40 7F  //ControlChange(1, 64, 127)
90 43 00  //NoteOn (1, G4, 0/Off)
//*Release the Sustain pedal
B0 40 00  //ControlChange(1, 64, 0)
90 41 40  //NoteOn (1, F4, 64)
//*Again, running state
41 00     //NoteOn (1, F4, 0/Off)
41 40     //NoteOn (1, F4, 64)
41 00     //NoteOn (1, F4, 0/Off)
40 40     //NoteOn (1, E4, 64)
//*Press the Sustain pedal
B0 40 7F  //ControlChange(1, 64, 127)
90 40 00  //NoteOn (1, E4, 0/Off)
...
I invite you to find the global numeric variable definitions in program.s and the text variables containing the pseudo-arrays on page 1 (page 0 remains the midi sending demo from 2 weeks ago, so that you have an all-in-one project) by loading the project file in the Nextion editor and to play with it, either in the simulator, or by uploading it to an intelligent Nextion HMI: midi_demo_2.HMI
Happy Nextioning!


