The Sunday Blog: Protocols and parsing
Part 3: Sending MIDI messages from Nextion HMI
Two weeks ago, we talked about data protocols and the active protocol parse mode of the Nextion HMI. Last week, we looked deeper into the protocol and data structure of the MIDI protocol which allows to exchange messages between electronic music instruments. You guess it, it can not only be handled in Nextion language, but using a Nextion HMI as a MIDI controller in standalone mode, which means without an external MCU like Arduino etc. has many advantages. Typically, most MIDI controllers (if this aren’t keyboards) have a status display or multiple rows of LEDs and many, many knobs and buttons. That isn’t forcibly ergonomic, especially when you are live on stage and you want just quickly change a single setting. In such situations, an intuitive GUI and dematerialized knobs, buttons and sliders give simpler usage, less production cost and make the “apparatus” ways more robust.
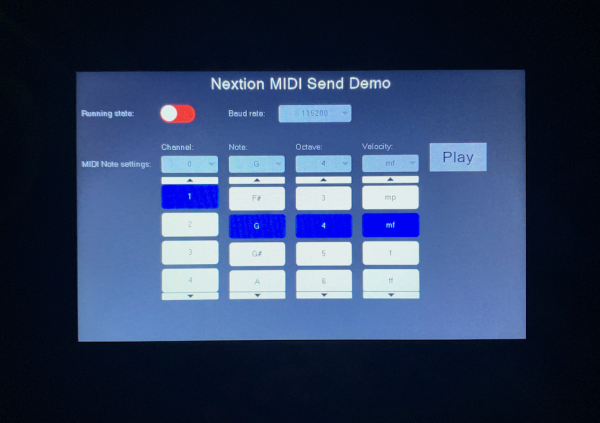
Actually, my colleagues in Shenzen/China are setting up the production of a small add-on board similar to the Foca Max power adapter, the Nextion MIDI I/O interface. While we wait for it to be ready, we’ll try to transform today our theoretical knowledge acquired over the last weeks (see linked articles in the previous paragraph) into a very simple demo application which allows us to select a few parameters and then to send the corresponding NoteON (when pressing “Play”) and NoteOff (when releasing “Play”) MIDI messages.
The “don’t use NoteOff” thing
Last week, we read about MIDI running state. This is a protocol simplification which allows to omit the command or status byte of a message when it is identical to the status byte of the previous message, thus sending only the one or two data bytes of the new message, saving time and reducing the latency. This can be applied to all so called channel messages like NoteOff (0x8n), NoteOn (0x9n), AfterTouch (0xAn), ControlChange (0xBn), ProgramChange(0xCn), ChannelPressure (0xDn), and PitchBend (0xEn).
That doesn’t help much when you are playing music, since each NoteOn message will earlier or later be followed by a NoteOff message. Since initially, NoteOff and NoteOn events generate different status bytes, running state wouldn’t apply most of the time. But there is a way around: After sending the NoteOn message for, let’s assume on Channel 1, middle C, mezzoforte, which results in 0x90 0x3C 0x4B, we would stop the note with 0x80 0x3C 0x4B – different status bytes, no running state possible. Instead, to end the note, we send again a NoteOn message for the same note, but with its velocity byte set to 0x00 (mute). Now, we’d have 0x90 0x3C 0x4B (NoteOn) … 0x90 0x3C 0x00 (NoteOff). And since both status bytes are identical, the second one can be omitted: 0x90 0x3C 0x4B … 0x3C 0x00.
Today’s example project
… makes use of this. You’ll find in the code of both, the TouchPress and the TouchRelease event of the “Play” button b0, the constant 0x90 to generate the status byte. Remember, the lower half of this byte must contain the MIDI channel. The value is taken from ComboBox cb0: It lists all the available channels from 1 to 16, but since the list is zero-based indexed, its .val attribute contains automatically the corresponding value between 0 and 15 or between 0x0 and 0xF hex. A simple addition of this value with 0x90 generates our status byte. Then, it checks if we haven’t activated the running state mode with sw0 or if this status byte is different from the previous one. In these cases, the status byte is sent with the prints command, otherwise it is omitted.
The first data byte must contain the MIDI note number. But I felt that a ComboBox for all 127 possible notes was not very ergonomic, so I split this up: ComboBox cb1 lets you choose the note by name (C, C#, D, D# E, …) and ComboBox cb2 the octave from -1 to 9. This is the American note naming convention which makes that the “middle C” of a piano is C4. Now, 12 notes and 11 octaves, that makes 132 notes in total. But MIDI allows only 127 notes, the highest note being G9, while our Comboboxes let us theoretically go up to B9. To prevent this overflow problem, I constrain the calculated value to a maximum of 127. That’s the first data byte which is then also sent out.
Now the velocity: There are 10 possible settings from pppp (almost not audible) up to ffff (maximum volume). The ComboBox transforms your choice into a value between 0 and 9. Multiplying this value with 13 and adding 10 gives us a velocity (second data) byte between 10 and 127 which is sent out last and completes the message.
This “algorithm” is used in the TouchPress and TouchRelease events of the “Play” button. The only difference, as explained above, is that on release, no velocity value is calculated, it’s simply set to 0.
Basically, that’s all, but…
Why is there a baud rate switcher ???
Initially, I did not intend to put it there. I had set the baud rate to fixed 31250 baud (which is required by the MIDI standard) in the program.s file. But that wasn’t a good idea! Most FTDI or CP2102 based TTL UART to USB adapters don’t support this baud rate! That makes that as soon as your code is running on your Nextion HMI, your PC can not longer communicate with it – no check of the return data in the simulator, and no new firmware updates…
After recovering my NX8048P050-011C-Y with the help of an SD card, I added that baud rate switcher. By default, this HMI project will run with the default baud rate which is stored in the bauds system variable inside your Nextion. The cb4 ComboBox allows now to switch temporarily over to 31250 baud, so that I could test this demo code with my breadboard prototype version of the upcoming Nextion MIDI I/O interface. Switching back to the default baud rate allows to connect the Nextion HMI to the simulator and to check the sent bytes, and uploading a new tft file, if needed.
The code
As always, a few global variables are defined in the program.s file before the default page is called:
int status_byte, last_status=0, data1_byte, data2_byte
page 0                       //Power on start page 0
After page0 is loaded, the default baud rate from bauds will be displayed and added to the list of ComboBox cb4:
covx bauds,cb4.txt,0,0
cb4.path=cb4.txt+" (default)\r"+"31250 (MIDI)"
The TouchPress event code of Button b0 contains everything to send the complete NoteOn message :
//assemble the status byte with "NoteOn" and the selected channel
status_byte=cb0.val&0x0F+0x90
//if running status active, check if status byte has changed, then transmit and update
if(sw0.val==0||status_byte!=last_status)
{
  prints status_byte,1
  last_status=status_byte
}
//calculate the note number from note and octave, then sanitize
data1_byte=cb2.val*12+cb1.val
if(data1_byte>127)
{
  data1_byte=127
}
prints data1_byte,1
//calculate the velocity number from dynamics, then sanitize
data2_byte=cb3.val*13+10
if(data2_byte>127)
{
  data2_byte=127
}
prints data2_byte,1
In the TouchRelease event, we’ve almost the same, just the velocity byte is simplified because it will always be zero:
//Instead of sending a NoteOff message, we'll send a NoteOn message with velocity=0
//which has the same effect.
//The advantage is that the status byte doesn't change and running status saves a byte
//assemble the status byte with "NoteOn" and the selected channel
status_byte=cb0.val&0x0F+0x90
//if running status active, check if status byte has changed, then transmit
if(sw0.val==0||status_byte!=last_status)
{
  prints status_byte,1
}
//calculate the note number from note and octave, then sanitize
data1_byte=cb2.val*12+cb1.val
if(data1_byte>127)
{
  data1_byte=127
}
prints data1_byte,1
//send zero velocity
prints 0,1
And that’s pretty all for today. Over the next weeks, we’ll learn how to send more and different MIDI messages and also how to parse and handle incoming MIDI messages which is a little more complex. But since it can be done on Arduino (there are many MIDI libraries available for it), it can also be done on Nextion HMI. Stay tuned…
Ah, I almost forgot it… here is the HMI file to play with it and to learn from it: midi_send_demo.HMI
Happy Nextioning!


