The Sunday Blog: Efficient coding
The 24h countdown timer
Inspired by a user’s questions in the Nextion forums, I thought it’d be a good idea to write this small 24h countdown timer and to explain step by step, how this can be achieved with a minimum of resource (RAM/Flash) consumption and a minimum of screen estate. To show all details and caveats, I decided to write today’s demo project for the Nextion Basic or Discovery HMI displays. The latter is less expensive and at the same time more powerful, thus it should be preferred for new developments. Both have one thing in common: they don’t have an integrated RTC (real time clock), so we’ll have to deal with a timer component, but it allows relatively precise operation when its strong and weak points are known, thus, please, continue to read…
In a later article, I plan to extend this for use with the Nextion Enhanced HMI with its rock solid RTC – stay tuned! 😉
Thinking first, coding afterwards
The timer applet as I imagined it should have 4 modes or statuses:
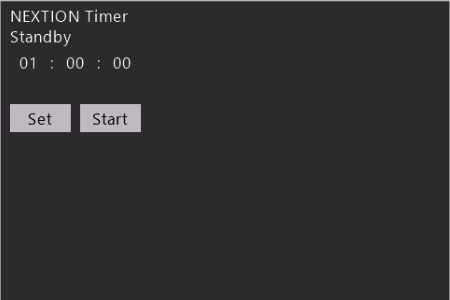
0 – Standby, showing the preset countdown time and two buttons, one to start the countdown, a second to enter the preset mode, allowing to modify the countdown time.
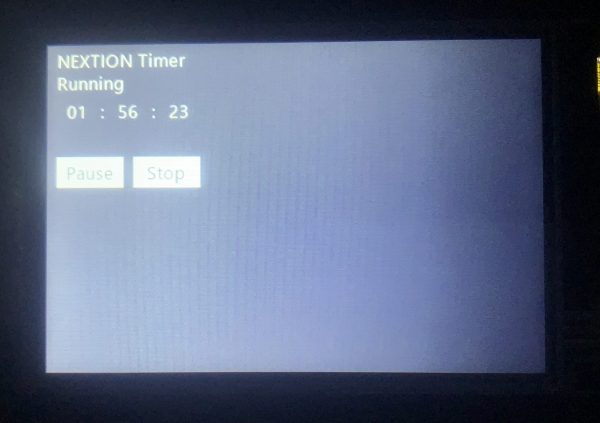
1 – Running, showing the currently running countdown time and two buttons, one to pause and one to stop the countdown, re-initializing everything.
2 – Paused, showing the currently halted countdown time and two buttons, one to resume the countdown from the current time, and one to stop/re-initialize the timer
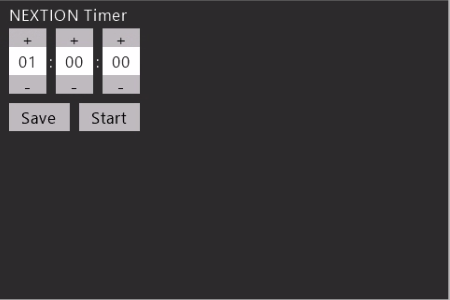
3 – Preset, showing the preset time highlighted, 6 small buttons to increase and decrease hours, minutes and seconds, and two buttons, one to save the preset, and one to start the countdown immediately from the new value.
4 statuses with 2 buttons each, makes 8 buttons plus 6 additional smaller ones in Preset mode, makes 14 from which 12 were hidden most of the time. That is definitively not efficient! That’s why I decided to hide/show only the 6 small increment/decrement buttons depending on the current status in code, while for the main functions, I’d keep only 2 buttons and change their text captions and functions depending on the current status. Since I was there, I decided at the same time to add a text component, showing the current status. All texts are within one single string variable component, separated by circumflexes, so that we can use it like an array with the help of the spstr function. The advantage is that if you want for example to localize your HMI in a different language, there is only one single string to modify in the editor, no need to go through the event code of x components until everything is found and translated.
Here are 4 screenshots, one for each status, showing the dynamic buttons:


Doesn’t that look neat and efficient?
Another gain of efficiency is to centralize TouchPress and TouchRelease event code, using a TouchCap component which handles all button actions in another one single place.
Then, there is code to update the display depending on the status and on the elapsed time (when running) which should be called either on different button action, on page load, and from the timer. Thus, in order to prevent redundant code, we pack that into two subroutines in the TouchPress and the TouchRelease event of the colon between the minutes and the seconds number display component and which isn’t normally touched by the user. But the click function allows us to call these subroutines from everywhere in our code. And if a user clicked accidentally on it, even though it’s so small? No problem, we’d just waste a few milliseconds for an unnecessary screen refresh which is acceptable.
Remember the KISS principle which I mentioned in previous articles? KISS stands from Keep It Simple and Safe. That means that in my humble opinion, we should separate our operational code from the external event triggering. With external event triggering, I mean code which shall be executed when the timer starts and when it stops. Here, I use a small hotspot named trig hidden behind the title text field which says “NEXTION Timer”, so that it can’t be touched by accident. Its TouchPress event holds the code to be executed when the timer starts and the TouchRelease event when the timer stops. In this demo, it sends the strings “tmr_on” and “tmr_off” to the external MCU (Arduino), but feel free to adapt it to your needs without fearing to impact all the other code.
A word about the Timer component
In opposite to most timer libraries which trigger an immediate interrupt when the time has come, the Nextion’s timer component works with periodic polling. That means that it is not that precise as you’d expect since the time to execute the timer event code adds somewhat to the timer interval. Thus, some “calibration” was needed to keep the error small. Some trial and error with the interval halving method showed on my 3.5″ Discovery HMI that a timer interval set to 996ms would definitively allow one run of the timer event code per second, from which we deduce that the timer event code runs for about 4ms. Feel free to do long-time observations and to adjust it, if needed!
Now, to the project
As usual, the program.s file holds a few global variable declarations and initialization before the startup page 0 is called:
int status=0
int set_secs=1
int cur_secs,disp_secs
int tmp, j,t_bco,t_pco
cur_secs=set_secs
page 0   //Power on start page 0
Then, the page PostInitialize event updates the display depending on the status by calling the corresponding subroutines:
// update the display
click sep_ms,0
click sep_ms,1
The subroutine for the status display, the buttons (display/hide and captions) and all the visual aspects is in the TouchRelease event of sep_ms:
tmp=status/3 // 1 if status==3 else 0
if(tmp>0)
{
  t_pco=stat_disp.bco // highlight if status==3 (tmp==1)
  t_bco=stat_disp.pco
}else
{
  t_pco=stat_disp.pco // normal if status<3 (tmp==0)
  t_bco=stat_disp.bco
}
for(j=h_up.id;j<=s_dn.id;j++)
{
  vis b[j],tmp // visible if status==3 (tmp==1)
}
for(j=h_disp.id;j<=s_disp.id;j++)
{
  b[j].pco=t_pco // apply normal/highlight
  b[j].bco=t_bco
}
vis stat_disp,1-tmp // visible if status<3 (tmp==0)
// button captions depending on status:
spstr captions.txt,actn0.txt,"^",status
spstr captions.txt,actn1.txt,"^",status+4
spstr captions.txt,stat_disp.txt,"^",status+8
The subroutine for updating the time display, displaying either the preset time or the current time, depending on the status, is in the TouchPress event of sep_ms:
if(status==0||status==3)
{
  disp_secs=set_secs
}else
{
  disp_secs=cur_secs
}
h_disp.val=disp_secs/3600
m_disp.val=disp_secs%3600/60
s_disp.val=disp_secs%60
Now to the buttons event handler, centralized in TouchCap tc0’s TouchPress event:
if(tc0.val==h_up.id&&set_secs<82800)
{
  set_secs+=3600
}else if(tc0.val==h_dn.id&&set_secs>3600)
{
  set_secs-=3600
}else if(tc0.val==m_up.id&&set_secs<86340)
{
  set_secs+=60
}else if(tc0.val==m_dn.id&&set_secs>60)
{
  set_secs-=60
}else if(tc0.val==s_up.id&&set_secs<86399)
{
  set_secs+=1
}else if(tc0.val==s_dn.id&&set_secs>1)
{
  set_secs-=1
}else if(tc0.val==actn0.id)
{
  tm0.en=0
  if(status==0)
  {
    status=3 //enter setting status
  }else if(status==1)
  {
    status=2 //enter pause status
  }else if(status==2)
  {
    status=2 //re-enter running status without restarting the countdown
    tm0.en=1
  }else if(status==3)
  {
    status=0 //enter standby status
  }
}else if(tc0.val==actn1.id)
{
  tm0.en=0
  cur_secs=set_secs // (re-)init countdown
  if(status==0||status==3)
  {
    status=1 //enter running status
    tm0.en=1
    click trig,1 // event trigger timer on
  }else if(status==1||status==2)
  {
    status=0 //enter standby status
    click trig,0 // event trigger timer off
  }
}
//update the display
click sep_ms,0
click sep_ms,1
Finally, there is the timer event code which simply decrements the countdown time by 1 second and updates the time display. Then, it checks if all the preset time is elapsed and if yes, re-enters the standby mode:
cur_secs--
if(cur_secs<1)
{
  status=0 // enter Standby mode and reset display
  click trig,0 // event trigger timer off
  tm0.en=0
  click sep_ms,0
}
click sep_ms,1
The “external” event triggers are in the TouchPress and the TouchRelease events of the hotspot and they are rather trivial for this demo, feel free to put your own event code here:
get "tmr_on"
and
get "tmr_off"
As usual, there is no need to rewrite everything, you might just download the project’s HMI file here: timer_project.HMI
I’d wish that you, dear readers, feel now inspired by this to write more efficient and optimized code in the future! Feedback and questions are always welcome in the Nextion forums on the nextion.tech website (registration required).
Happy Nextioning!


