The Sunday Blog: Advanced programming techniques
Input validation
Sometimes, when developing a project, we discover that a specific functionality for our specific use case seems to be missing. As an experienced developer, you would think of solving this by quickly overloading a component object with new member variables and functions as you’d do for example in Java. But, unfortunately, the embedded MCU on the backside of our Nextion HMI display can not offer you enough space for code and variables on one side, and a full fledged object oriented runtime interpreter on the other side.
That does NOT mean that components can’t see their functionality extended by user code. Although I showed you already last October how this can be done, extending a progress bar component into an animated progress bar, not everybody read this post or can adapt the procedure to another component.
So, today, let’s have a look onto how to enhance the number component in combination with the on-screen keyboard, so that inputs can be limited between a minimum and a maximum.
First, the strategy!
To solve quickly the task, we spend some time thinking about the required steps before we start coding. This will save much time afterwards.
Our steps are:
- Defining the minimum and maximum values for each number component as global variables in the program.s file
- Writing event code in the page load event, so that minimum and maximum values are displayed as information for the user
- Writing event code in the page load event to constrain the actual number values within their min and max (since these are global, they might have been altered by another page or external commands)
- Defining a global minimum and maximum value and a few helper variables which the screen keyboard will use for validation
- Writing event code for each number component’s touch event to copy the individual minimum and maximum values into the global keyboard values so that the keyboard is informed about the limits to apply when it pops up
- Adding code to the on-screen keyboard’s “OK” button touch release event to check if the current value is within maximum and minimum. If not, do NOT copy the input to the number component and close the keyboard, but constrain the value and make the input field’s background color red to alert the user, so that they might modify their input
- Adding code to the on-screen keyboard’s “DEL” button touch release event to make the input field’s background white again
An example project in 7 steps
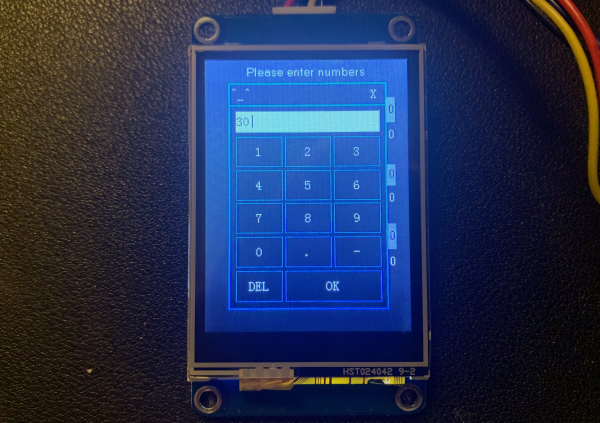
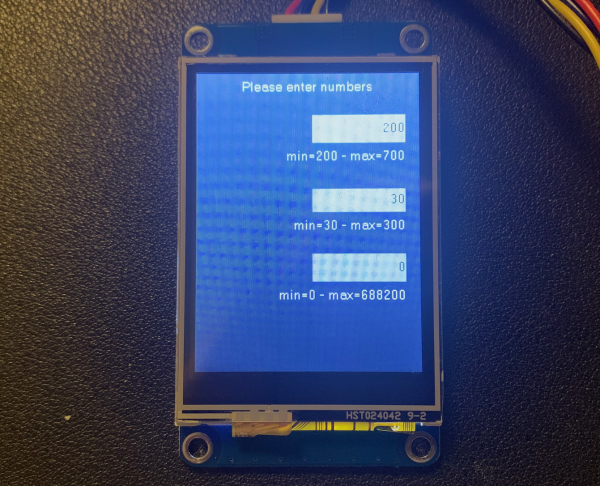
Our example project (you may download the .hmi file at the end of the article) has 3 number fields, 3 text fields, one below each number component to indicate the individual min and max values, and a 4th text field as a screen title:
Step 1: Defining the minimum and maximum values for each number component as global variables in the program.s file
//Define individual limits:
int n0_min=200
int n0_max=700
int n1_min=30
int n1_max=300
int n2_min=0
int n2_max=688200
Step 2: Writing event code in the page load event, so that minimum and maximum values are displayed as information for the user
//Display the limits
covx n0_min,va0.txt,0,0
t1.txt="min="+va0.txt+" - max="
covx n0_max,va0.txt,0,0
t1.txt+=va0.txt
covx n1_min,va0.txt,0,0
t2.txt="min="+va0.txt+" - max="
covx n1_max,va0.txt,0,0
t2.txt+=va0.txt
covx n2_min,va0.txt,0,0
t3.txt="min="+va0.txt+" - max="
covx n2_max,va0.txt,0,0
t3.txt+=va0.txt
Step 3: Writing event code in the page load event to constrain the actual number values within their min and max
//Apply the limits
if(n0.val<n0_min)
{
  n0.val=n0_min
}
if(n1.val<n1_min)
{
  n1.val=n1_min
}
if(n2.val<n2_min) { n2.val=n2_min } if(n0.val>n0_max)
{
  n0.val=n0_max
}
if(n1.val>n1_max)
{
  n1.val=n1_max
}
if(n2.val>n2_max)
{
  n2.val=n2_max
}
Step 4: Defining a global minimum and maximum value and a few helper variables which the screen keyboard will use for validation
Back in program.s, we add:
//Define required globals
int kbd_min, kbd_max,kbd_tmp,kbd_rtn
Step 5: Writing event code for each number component’s touch event to copy the individual minimum and maximum values into the global keyboard values
Here the respective code for the number components n0, n1, and n2, all very similar:
kbd_min=n0_min
kbd_max=n0_max
kbd_min=n1_min
kbd_max=n1_max
kbd_min=n2_min
kbd_max=n2_max
Step 6: Adding code to the on-screen keyboard’s “OK” button touch release event to check if the current value is within maximum and minimum.
This is somewhat more complex. First of all, when linking a number field to an on-screen keyboard, the editor will automatically add a keyboard page to your project, depending on the selected keyboard type. We opt for the numeric keyboard, so the new page (on which we want to extend the code) will appear as keybdB in the page list. It is by default locked, in order to modify the code, we’ll have to do a right click on it and select “Unlock”.
Now, we move over to the TouchRelease Event code for the OK button and we find already 47 or so lines of code. Nothing to be intimidated, since it is divided in three sections, one for handling number components, one for xfloat components, and one for text components. We’ll only touch at the number section and a little to its surroundings. For better readability, the original code has either been greyed or shortened.
//Assign loadpageid.val  and loadcmpid.val before call this page.
//loadpageid.val is the caller page id, loadcmpid.val is the caller component id.
//Our new validation code for numbers part 1
kbd_rtn=1// return by default at the end
// * End part 1 *
if(p[loadpageid.val].b[loadcmpid.val].type==54)
{
  //Our new validation code for numbers part 2
  covx input.txt,kbd_tmp,0,0
  if(kbd_tmp<kbd_min) {
    show.bco=RED //alert visually
    covx kbd_min,input.txt,0,0 //set min value
    kbd_rtn=0 //do not return
  }else if(kbd_tmp>kbd_max)
  {
    show.bco=RED //alert visually
    covx kbd_max,input.txt,0,0 //set max value
    kbd_rtn=0 //do not return
  }else
  {
    show.bco=WHITE //remove alert
    //proceed normally
    covx input.txt,p[loadpageid.val].b[loadcmpid.val].val,0,0
    // * End part 2 *
  }
}else if(p[loadpageid.val].b[loadcmpid.val].type==59)
{
  // here is all the lengthy stuff for the xfloat component, don't touch!
}else
{
  p[loadpageid.val].b[loadcmpid.val].txt=input.txt
}
//Our new validation code for numbers part 3
//proceed only if validation has passed
if(kbd_rtn>0)
{
  page loadpageid.val
}
Step 7: Adding code to the on-screen keyboard’s “DEL” button touch release event to make the input field’s background white again
input.txt-=1
show.txt=input.txt
show.bco=WHITE //reset visual alert
That was it. A few small additions here and there, and we get greatly improved functionality. For those who want to try it out or even to integrate this into their own projects, feel free to download number_constrain.HMI and to play with it.
Thank you for reading and…
happy Nextioning!


