The Sunday Blog: Developing and debugging
How can I… (step by step)?
Having a look onto different internet forums and Nextion HMI related pages and groups on the well known social networks, almost every day, I stumble over questions like “Hey guys. I want to send a scroll text from arduino to nextion. Can someone tell me what code do I need to use? I’m kinda a noob in nextion.” My first (inner and silent) reaction is often: “How can one ask such elementary things? Everything is so well documented in the Nextion Editor Guide and in the Nextion Instruction Set documents online and the rest is easy-peasy coding in the almost oversimplified C/C++ dialect by Arduino!” But then, I must tell myself that most probably, not all of our valued customers and my valued readers have a master or engineer degree in software developing or any other IT domain. I had furthermore to learn that most people who use the Arduino IDE aren’t even aware of the fact that when they compile a .ino file (a sketch), the compiler goes through up to 200 hidden or invisible files which come with the Arduino IDE, to handle all the startup action of the CPU like activating the different clock generators for the CPU core and the integrated peripherals, then initializing and activating these peripherals (GPIO, I2C, SPI, USB, etc.) and finally set up the internal interrupt vectors table, before setup() and then loop() is finally executed. So, it’s easy to say that, if you want your system to take a specific action, you just have first to think like your system an then simply find the right words to tell it what it has to do.
Naturally, a single blog post or even a series of these can not replace 5 years spent at whatever polytechnic university. But by picking example questions like the one cited above and by cutting the desired action down into small steps, providing enough background information from time to time will hopefully help the one or the other of my readers to come closer to “think like your system does”.
How does a Nextion HMI work?
I think, the best description could be by elimination. That means, we look first at how things would be done if HMIs didn’t exist:
You had then a simple LCD display with only a LCD driver IC on its back side. Displaying something on the screen consisted of writing code on your Arduino which would have to define a 16bit color value for each single pixel of your 320 x 240 pixel display. So, this makes a 16bit or 2byte value for each of the 76,800 LCD pixels, or in other words 153,600 bytes for each full screen. You see it coming, that looks impossible on an Arduino UNO with only 32768 bytes of flash memory and only 2048 bytes of RAM.
Fortunately, there are some mechanisms which ease the task. First is the LCD driver IC which has its own RAM to keep the full screen image data, so that we don’t have to keep it on the Arduino, but we can process and send over much smaller chunks of data. The next step is to get the data over from the Arduino to the LCD driver IC. Independent of the way you process image data, 153,600 bytes of pixel data are to be transferred for a full screen. To which add some addressing data and parameters for the LCD driver hardware.
But again, fortunately, there exist software drivers, called libraries, to ease such tasks. Basically, each of these gives you a new set of commands (that’s what we call an API) which allow you to reduce complex tasks like setting the manifold startup parameters of the LCD hardware to a simple one-liner in your Arduino sketch, like myLCD.init(ILI9341,320,240,I2C,4,5). With this, you tell the library to initialize the communication with a LCD display which has a ILI9341 driver IC, a width of 320 and a height of 240 pixels, which communicates over I2C, using pin 4 as the SDA and pin 5 as the SCL wire of the I2C bus. Then, you don’t have to care about the around 2000 lines of code executed by the library to get all this done and it remains a “black box” for you, while it calls other libraries, like the I2C software driver and the ugfx8 helper in the background.
Then, you want to display some text on your LCD. Again, it’s a one-liner like myLCD.writeText(“Hello World”,black,white,50,50,100,30), telling to write this text starting at coordinates (50,50) black on write background, in a 100px wide and 30px high box. This again executes about 300 instructions in the background and finally sends a little more than 6000 bytes over I2C to the LCD. And that’s the simplified description, I willingly omitted the story of including and scaling a pre-generated font (which will also eat up a huge part of your Arduino’s flash memory).
You see, just writing some simple text on a dumb LCD can be challenging for the Arduino and for you! And we didn’t yet talk about a touch sensitive display which at each touch would trigger an interrupt on your Arduino and you’d be forced to code an interrupt service routine which would request the touch coordinates from the touch controller hardware (again over I2C), then look up if there is an element on your screen at these coordinates, and if this is meant to react on touch, and if yes, execute the predefined event handler.
And that’s how the Nextion HMI works
Since it has its own CPU, its own flash memory and its own RAM, it does most of the previously described tasks and even some more without using the precious memory and CPU cycles of your Arduino (or PIC, or ESP, or STM, or Teensy). Furthermore, you don’t have to write a single line of code to display things on the screen because you have the free WYSIWYG Nextion editor at hands which allows you to “compose” or “draw” your screen with a few mouse clicks by placing components on the current page. Your Arduino comes only into play when you want to modify the screen content programmatically, such as displaying some text in a Textbox component. And even this doesn’t require complex coding since it’s just sending a simple command string in ASCII format, followed by three terminator bytes. In many cases, a library is even not needed, just using Serial.print() and Serial.write() will be enough.
Creating the Screen with the Nextion Editor
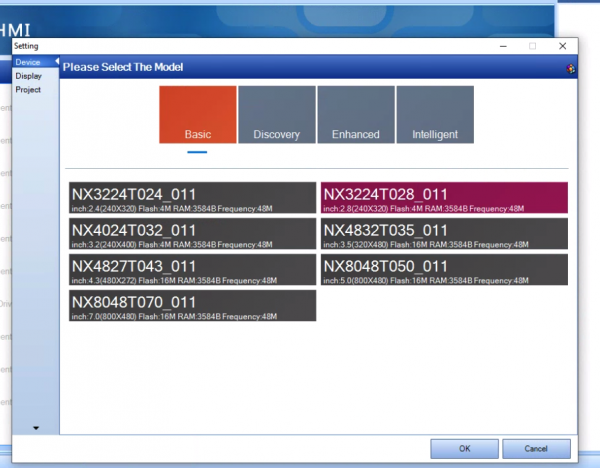
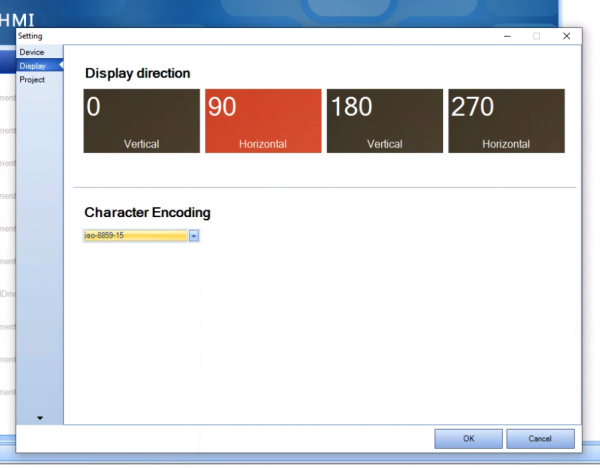
Step 1: Launch the Nextion Editor, click “New” in the icon bar, define a file name like “scrolltextdemo” and click “Save”. Then, a “Settings” screen will pop up where we define which Nextion model we’ll be using, and then which screen orientation and character encoding.
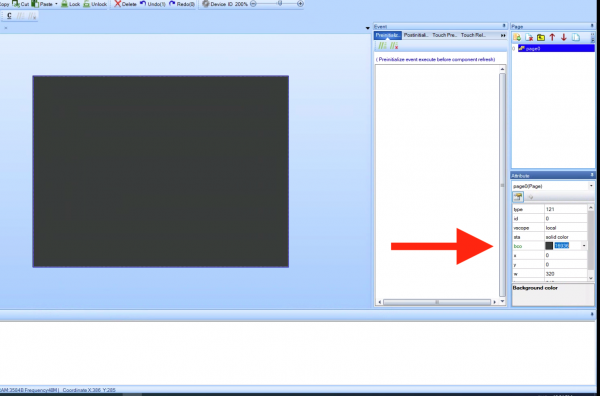
Step 2: Click “OK”. Now your new, empty HMI project is ready for designing. We move over to the attribute pane, where we use the bco attribute of the page to set a dark grey background. Either we use the color picker or we simply enter the RGB565 value of 16394.
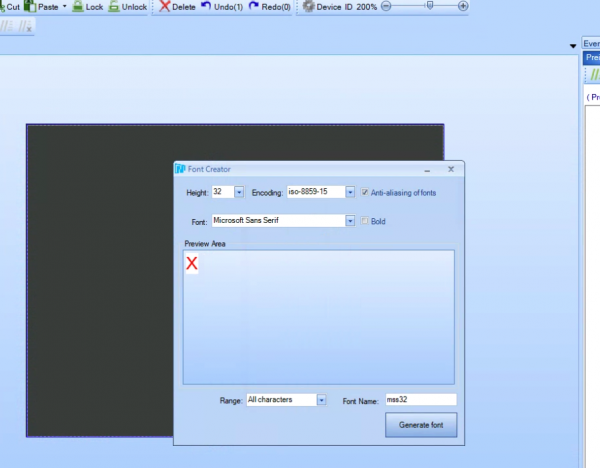
Step 3: Since we want to display text, we’ll have to generate a font. In the top menu, select “Tools” -> “Font Generator”. Let’s select a letter height of 32 pixels, keep the default encoding (iso-8859-15 for Western Europe) and select the Microsoft Sans Serif font. Give it a font name like mss32 and click “Generate Font”. In the now popping up “Save As” dialog, enter a file name for the generated .zi font file (I decided to use “mss32” again) and click “Save”. Another pop up will inform you that the font has been generated. Confirm with “OK”, and the next dialog with “Yes” to add the just berated font to our project. Close the font generator window.
Step 4: Move over to the Toolbox pane and click onto the Scrolling Text component. You’ll see the textbox appear at the top left corner of the screen. Use the mouse to position it at the center of the screen or use the Attribute pane to set the component’s coordinates accordingly.
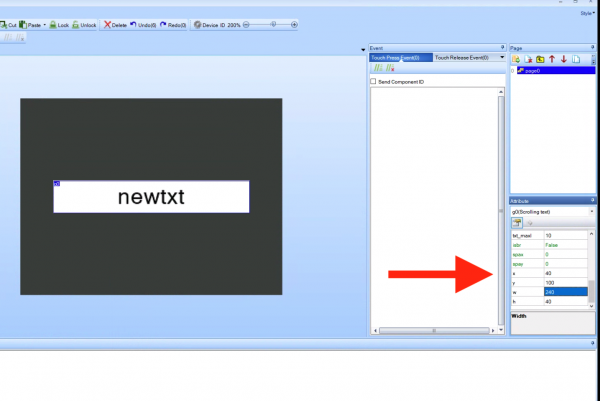
Step 5: Since we won’t display the default text (“newtxt”) but change it programmatically, we use the attribute pane to change the txt_maxl attribute to 20, so that we can display a 20 characters long message. Then, we remove the default text from the txt attribute and we are done with the screen design.
Change the content dynamically
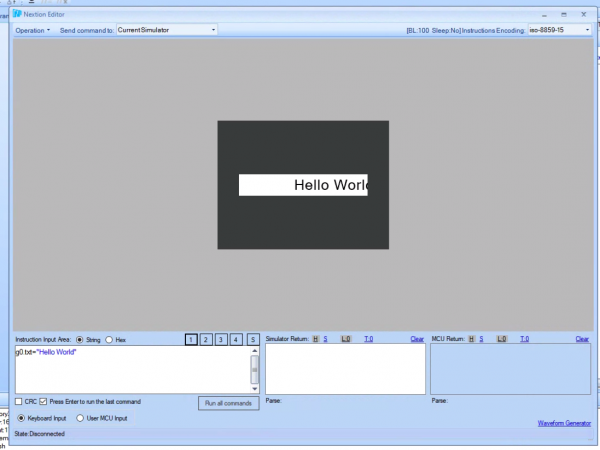
Step 6: Before we start writing code for the Arduino, we use the integrated simulator and debugger to test everything. Click on “Debug” in the icon bar. Now, in the Instruction Input Area, we enter g0.txt=“Hello world” and then click the “Run all commands” button. If we did everything well, we’ll see “Hello World” scrolling from right to left repeatedly through our text box. Mission accomplished! We are now sure that on Nextion side, everything works.
Step 7: We close the simulator window and we use either the “Upload” or the “Compile” button in the icon bar to compile our Nextion “sketch” and to upload it onto our display.
Now to the Arduino side
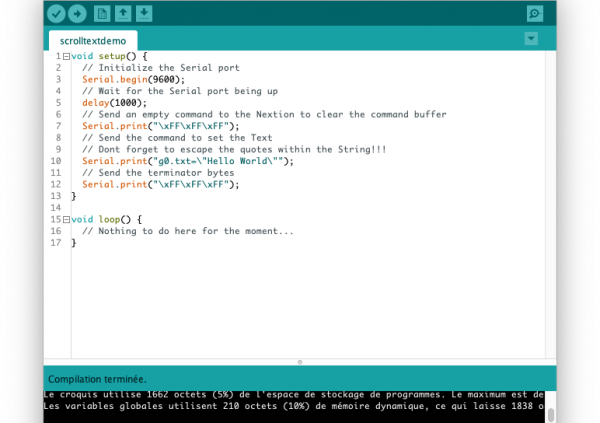
Assuming we use an Arduino Mega with the Nextion connected to Serial1 on pins 18 and 19 to not to interfere with the default USB Serial port, we need very few code: We’ll have to initialize Serial1 at 9600 baud, send an empty command (just the 3 terminator bytes) to the Nextion to clear its command buffer. Then, we send the already known and tested (in the simulator) command string and again the 3 terminator bytes. Very simple, short, and easy:
void setup() {
  // Initialize the Serial port
  Serial1.begin(9600);
  // Wait for the Serial port being up
  delay(1000);
  // Send an empty command to the Nextion to clear the command buffer
  Serial1.print("\xFF\xFF\xFF");
  // Send the command to set the Text
  // Dont forget to escape the quotes within the String!!!
  Serial1.print("g0.txt=\"Hello World\"");
  // Send the terminator bytes
  Serial1.print("\xFF\xFF\xFF");
}

void loop() {
  // Nothing to do here for the moment...
}
That’s it. Thank you for reading – happy Nextionning!


