The Sunday Blog: Modern GUI design
More effect with less code

As an application developer, you are required not only to implement the specified functionalities, but also an ergonomic GUI (Graphical User Interface). While it is very easy to add visual and non-visual components to a page with the wysiwyg Nextion Editor, you shouldn’t forget about ergonomic aspects. Too much information or interactive components like buttons on a single page can make it difficult for the end user to have the maximum benefit from your product. It’s often better to group several components on one page and others, perhaps the less used, on a second page. But this leads to new challenges because you’ll have to add navigation buttons or a menu or whatever. Or not? Let me show you today how things can be done in a smartphone-GUI-like style.
The example project
For the example project, let’s imagine an application with 4 main screens, let’s call them “Screen 1” to “Screen 4” (in reality, these correspond to pages 0 to 3). In addition to this, we want a “Settings” screen (page4) and an “About” screen (page5). The “Settings” and the “About” screen should be reachable from each of the four main screens and in order to keep things simple, you should be able to return directly to the main screen from which you came before. Doing things the classic way means probably putting 4 buttons on each of the 4 main screens (“Previous”, “Next”, “Settings”, “About”) and a single “Return” button on both, the “Settings” and the “About” screens. Then (I write that with a slightly provocative undertone), your application will for sure work well, but users might complain about the “Win95” style. And you as a developer are annoyed because you had to waste precious screen surface for 4 buttons on each main screen and to write 4 x 4 = 16 event handlers…
The modern way
Did you know that the Nextion Intelligent (P series) HMI has many functionalities built in, which allow modern smartphone-style user interaction without writing a single line of code? That you can swipe from one screen to another without components and code? That there are many animation effects which can improve the look-and-feel of your GUI, again without a single line of code!
Let’s look how this can be done:
I define for my application as follows…
Swiping left page0 -> page1 -> page2 -> page3 -> page0 (cycling)
Swiping right page0 -> page3 (cycling) -> page2 -> page1 -> page0
Swiping down [page0 to 3] -> page4 (“Settings”) and page5 (“About”) -> previous [page0 to 3]
Swiping up [page0 to 3] -> page5 (“About”) and page4 (“Settings”) -> previous [page0 to 3]
So, for the 4 main Screens page0 to page3, I can already set the page .up, .down, .left, and .right attributes:
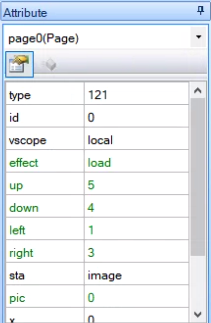 This is the example for page 0, for page1 to page3, change the .left and .right attributes accordingly.
For page 4, only the .down attribute is required, but it will be set dynamically, depending on the page from which we came. Similar for the .up attribute of page5.
That means, we need to store the id of the main screen page from which we came. That’s done in their respective page exit event code panes:
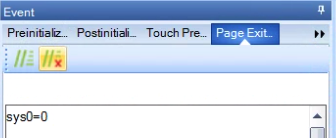 For page 1, it will be sys0=1, for page2 sys0=2, for page3 sys0=3.
When we swipe right or left to move between main screens, this value has no importance, but when we swipe up or down (to “Settings” or “About”) their corresponding attribute will have to be set in their page preinitialize events:
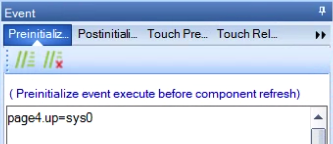 this for page4, and page5.down=sys0 for page5
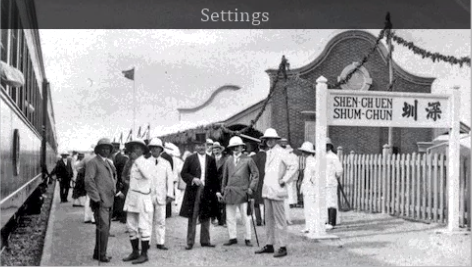
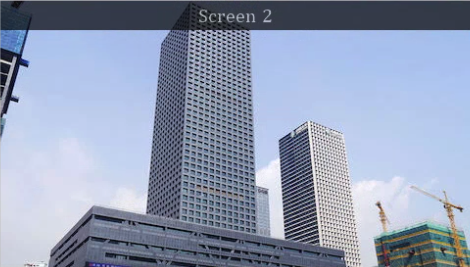
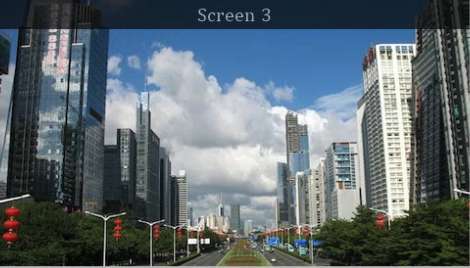
These are the only 6 lines of code which we need for our GUI framework. Besides of that, to make this demo more appealing, I added different full screen page background images. I decided to put some pictures of Shenzen, China, where the Nextion HMI is manufactured.
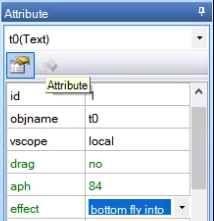
To add information to the interface, I added a text component as a title bar to each page. Background color (.bco) black, foreground color (.pco) white. And I set the transparency attribute (.aph) to 84, so that the background image shines still a little through. And (not really required, but a nice feature), I set the text component’s .effect attribute to “bottom fly into”:
 You’ll find the full HMI project file for download at the end of this article. You may compile and upload it to any 4.3″ P series Nextion, resistive or capacitive, with or without enclosure, no matter. Besides the full screen background images which you’ll most probably replace or remove in your own projects, this demo project can naturally also be used as a draft for your own development on the bigger, 5″, 7″, an 10″ P series. If you haven’t yet one of the new Intelligent P series displays, you can also load this demo into the Simulator of the Nextion editor and get already familiar with the new functionalities.


And here, as promised, the hmi file: hiden_treasures
Thank you for reading, happy swiping, and happy Nextioning!


