The Sunday Blog: The enhanced “K” HMIs
Part3: Clock art
Inspired by the famous and extremely stylish, impressive and expensive wall clocks manufactured by the German QLOCKTWO GmbH which I saw for the first time in a hotel in Lausanne/Switzerland some years ago, I thought that we could try to do something similar on our Nextion Enhanced HMI displays. Please accept that their designs are protected and copyrighted, thus, to avoid any legal trouble, do NOT make a commercial project of this! This article and the related code are for didactic purposes only.
The underlying technical principle is to read the RTC clock values and to process these, so that they are displayed in the form of spoken language, highlighted from a static letter pattern. In this article, we’ll see how this can be done in the Nextion programming language. Today, we’ll limit to the English edition, but I have plans to extend the project to be multilingual (using the EEPROM) in one of the next articles.
The GUI first
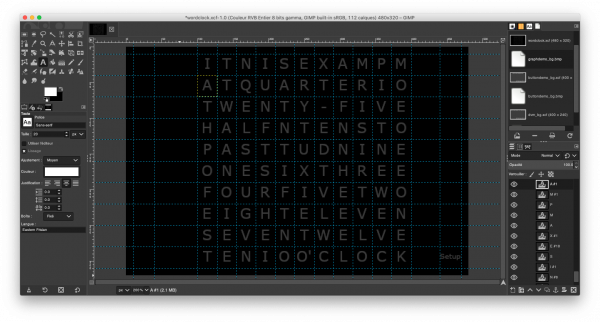
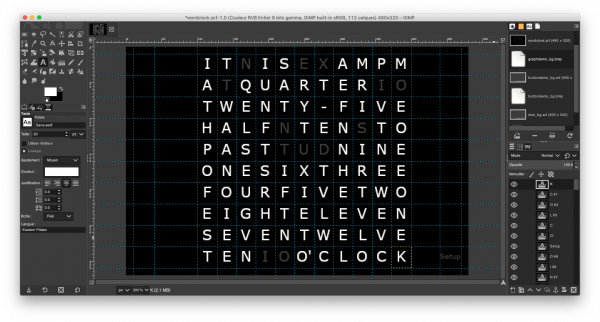
Since we are on a purely static 11 x 10 letter pattern which requires pixel-perfect equal letter spacing, I decided to not fiddle with 110 Text components, but to use the two-fullscreen-background-picture technology. It consists in designing the screen twice, once in a passive state where all elements are disabled (dark text in our case), and once in an active state where all elements are enabled (white text in our case). For this, you might use any pixel graphics software which allows you to precisely place elements with the help of guide lines and which allows you to work with layers, such as for example Photoshop or Gimp. At the end, to avoid quality loss, you should be able to export your creations in RGB565 encoded bitmap format.
And that’s how it looks in Gimp:
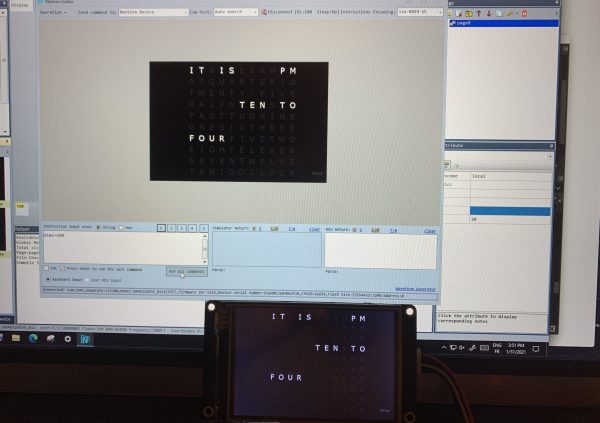
Then, we import the generated bitmaps into our HMI project. The passive version first, which will have the id=0, then the active one with the id=1. And we make the passive version our page background. Afterwards, we place Crop components over our “zones of interest”. Their crop image attribute (picc) by default will be 0. As soon as we change the picc attribute to 1, the zone will be highlighted. We may retrieve the needed x and y coordinates, the height and the width of these crop zones directly from the x and y values of the guide lines in our graphics software. The result looks then as follows:
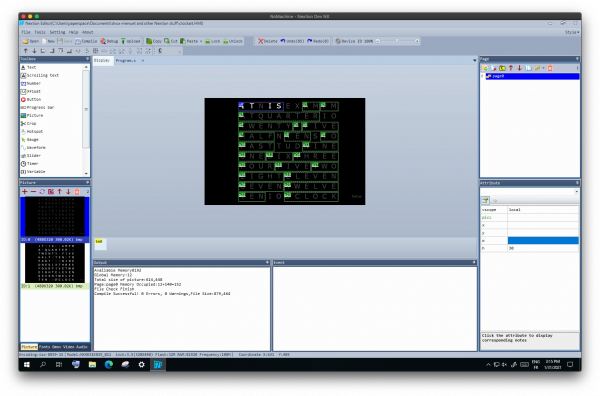
Our Crop component q0 which covers “IT IS” in the English version will always be highlighted, so we can set its picc attribute to 1 in the editor and forget about it. The others will be set dynamically from our code.
The Code
As for all our RTC based projects, we need a timer to update the display in regular intervals. Everything can then go into this timer’s event code. But before we start coding, we have to think a little, because, depending on the selected display language, things aren’t always strictly logical and straightforward. For the English version, we have to think about the fact that the rtc3 values (hours) from 0 to 23 have to be translated into 12AM, 1AM, 2AM, …, 11AM, 12PM, 1PM, 2PM, …, 11PM. But still more complicated: 23 is not always 11PM. 23:45 for example has to be displayed as “a quarter to 12AM”…
Then, we have to cut the 0 to 59 minutes into 12 slices which will translate into o’clock, five past, ten past, a quarter past, twenty past twenty-five past, half past, twenty-five to, twenty to, a quarter to, ten to, and five to. The latter can be easily obtained by dividing rtc4 by 5, mapping the minutes into values from 0 to 11 (the variable called disp5min) which represent our 5 minutes slices. This helps us already with the question of highlighting “TO” or “PAST: From 1 to 6, it’s “PAST”, and from 7 to 11, it’s “TO”, 0 (the full hour) shall display none of both. And as soon as it’s “TO”, we have already to display one hour more than the RTC indicates. We store the hour to display in the variable disphour. Both disphour and disp5min are declared as global integers in the program.s header file.
//calculate the actual 5min slice:
disp5min=rtc4/5
//calculate the actual hour to display:
disphour=rtc3
//if it's "TO", add an hour:
if(disp5min>6)
{
  disphour++
}
//handle roll=over:
if(disphour>23)
{
  disphour-=24
}
//highlight AM or PM:
if(disphour<12)
{
  q1.picc=1
  q2.picc=0
}else
{
  q1.picc=0
  q2.picc=1
}
//now cut it down to the 12h format:
if(disphour>11)
{
  disphour-=12
}
if(disphour==0)
{
  disphour+=12
}
Now, highlight the corresponding hour
Indirect addressing by giving consecutive id’s to the corresponding Crop components could have made this shorter, but I wanted to keep all options open for further language variants.
//highlight ONE
if(disphour==1)
{
  q12.picc=1
}else
{
  q12.picc=0
}
//highlight TWO
if(disphour==2)
{
  q17.picc=1
}else
{
  q17.picc=0
}
//highlight THREE
if(disphour==3)
{
  q14.picc=1
}else
{
  q14.picc=0
}
//highlight FOUR
if(disphour==4)
{
  q15.picc=1
}else
{
  q15.picc=0
}
//highlight FIVE
if(disphour==5)
{
  q16.picc=1
}else
{
  q16.picc=0
}
//highlight SIX
if(disphour==6)
{
  q13.picc=1
}else
{
  q13.picc=0
}
//highlight SEVEN
if(disphour==7)
{
  q20.picc=1
}else
{
  q20.picc=0
}
//highlight EIGHT
if(disphour==8)
{
  q18.picc=1
}else
{
  q18.picc=0
}
//highlight NINE
if(disphour==9)
{
  q11.picc=1
}else
{
  q11.picc=0
}
//highlight TEN
if(disphour==10)
{
  q22.picc=1
}else
{
  q22.picc=0
}
//highlight ELEVEN
if(disphour==11)
{
  q19.picc=1
}else
{
  q19.picc=0
}
//highlight TWELVE
if(disphour==12)
{
  q21.picc=1
}else
{
  q21.picc=0
}
And the remaining elements, TO/PAST, FIVE, TEN, A QUARTER, TWENTY, TWENTY-FIVE, HALF
… which is sometimes tricky, because FIVE has to be highlighted at five past, twenty-five past, twenty-five to, and five to, for example, you’ll see.
//highlight TO or PAST
if(disp5min>0&&disp5min<=6)
{
  q10.picc=1
  q9.picc=0
}else if(disp5min>6)
{
  q10.picc=0
  q9.picc=1
}else
{
  q10.picc=0
  q9.picc=0
}
//highlight O'CLOCK
if(disp5min==0)
{
  q23.picc=1
}else
{
  q23.picc=0
}
//highlight FIVE
if(disp5min==1||disp5min==5||disp5min==7||disp5min==11)
{
  q6.picc=1
}else
{
  q6.picc=0
}
//highlight TEN
if(disp5min==2||disp5min==10)
{
  q8.picc=1
}else
{
  q8.picc=0
}
//highlight A QUARTER
if(disp5min==3||disp5min==9)
{
  q3.picc=1
}else
{
  q3.picc=0
}
//highlight TWENTY
if(disp5min==4||disp5min==5||disp5min==7||disp5min==8)
{
  q4.picc=1
}else
{
  q4.picc=0
}
//highlight -
if(disp5min==5||disp5min==7)
{
  q5.picc=1
}else
{
  q5.picc=0
}
//highlight HALF
if(disp5min==6)
{
  q7.picc=1
}else
{
  q7.picc=0
}
Setting the clock
Over the last weeks, we have seen enough examples how you can set or adjust the Nextion’s HMI. I re-used a again simplified variant (only screen controls, no external peripherals) in a separate page which opens when you click on “Setup” in the lower right corner of the main screen. After all the detailed blogs about this topic, you should easily understand how it works.
That’s it, at least for today. As always, you do not have to repeat all the graphics and coding work, I did it for you. Here is a ready-to use hmi file for the 3,5″ enhanced display: clockart.HMI
Feel free to play with it! I personally find that AM/PM in the upper right corner irritating and I’d rather let it disabled. But that’s a question of personal taste…


