The Sunday Blog: Talking to your Nextion HMI
Part 9: Let’s create a universal component class
We created already a universal communication class in the last two episodes (Part 7 here and Part 8 here). It allows us with a little less than 60 lines of code in a separate .h file to handle one or even multiple Nextion HMIs connected to our MCU (Arduino or whatsoever), optionally using a second serial port for debugging each. And we can use this classes’ cmdWrite() method to send commands to each of our connected Nextion HMIs without caring about the terminator which is automatically added. With this “Multiple Nextion HMIs on one Arduino”, we went already beyond most existing libraries.
Since, depending on our MCU and its number of serial ports, our class has alternatively to deal with HardwareSerial, SoftwareSerial, AltSoftSerial, USBSerial, we learned that the GNU C++11 compiler which is used by the Arduino IDE is a bit (in fact, very very) finicky about the type of passed object references (Serial, Serial1, Serial2, etc.) when it comes to construct depending objects like our NexComm class, we had the occasion to learn about template classes. We will make use of this knowledge later.
Function macros to ease things still more
Remember two weeks ago where we had to declare our NexComm object(s) like this ?
NexComm<HardwareSerial, HardwareSerial> Nex1(Serial1, Serial);
Although the ability to use multiple serial ports of multiple types is a huge advantage over other libraries, the declaration of the object is rather long, looks complicated, and you have to know in advance which type names your selected serial ports have in your IDE. How much time takes it to find out that for all Teensy 3.x MCUs, Serial is of the type usb_serial_class? But why tell this to the compiler while the GCC toolchain is theoretically aware of it? The C++ function decltype() helps us with this. decltype(Serial) gives us for example “HardwareSerial” for the Arduino UNO and MEGA, or “usb_serial_class” for the Teensy 3.x. If we created software emulated serial ports before, the answer would be “SoftwareSerial” or “AltSoftSerial”, depending on the library you use.
This allows us to add two simple function macros to create the complex declarations like above with only 2-3 parameters. Since function macros are evaluated at compile time, they can’t be overloaded dynamically, so we have to create one with using a debug port, and one without on top of our nexnextioon.h file:
#define initCommDbg(n,d,o) NexComm<decltype(n)&, decltype(d)&> o(n,d)
#define initComm(n,o) NexComm<decltype(n)&> o(n)
The first, initCommDbg(n,d,o) takes three parameters, the Nextion port, the Debug port and the chosen object name. Adding initCommDbg(Serial1, Serial, Nex1) to our sketch.ino file will replace this exactly by Nexcomm<Serial1Type, SerialType> Nex1(Serial1, Serial) at compile time without any impact at runtime.
Same for the second, initComm(Serial,Nex) will translate to NexComm<SerialType> Nex(Serial). Easy and beautiful as you will see at the end of this article.
Now, how should a component class look like?
The usual approach in most libraries is to create one class for each component type, i.e. one for the Text component, one for the Scrolling text component, one for the Number component, and so on. This leads in general to relatively big libraries with much redundant code which is difficult to understand and to maintain, especially in two cases. The first problem is what to do when a new component type appears in the Nextion editor, like the Xfloat component ? And the second, still more important problem, what to do if the attribute set of a component is variable, i.e. when the sta attribute is “solid color”, then there is a bco attribute. But when the sta is set to “image”, the bco attribute disappears. How can this be handled by pre-defined attribute sets? It can’t. So, we will use a radically different approach.
We will provide our object with only one method to modify a component’s attribute: setAttr(attribute, value). This can be used for whatever numeric attribute, i.e. setAttr(“bco”, 1024) will set the background color of the component to green. Or, for a number or progress bar component, setAttr(“val”, 50) will set its value to 50. And if we add a second definition for setAttr() to our class, it can even take text as a parameter, like setAttr(“txt”, “Hello world!”). Simple and efficient – one fits all!
But we have neglected several aspects for the moment. First, a full command string to change a component’s attribute is “pageName.componentName.attribute=value” (plus Terminator) or, when it comes to text “pageName.componentName.attribute=\”text\”” (plus Terminator). At a first glance, we’d have to initialize each component object with several parameters: First, the type and the name of the corresponding NexComm object (remember, we can theoretically have multiple Nextion HMIs connected). Second, the page name. And third the component name. Since our NexComm object is a template class, although we managed successfully to hide that with our function macro, the new NexComp object has forcibly to be a template class, too. But again, a function macro will help us. After creating our communication object with one of the two initComm macros, and giving it a name like “Nex1” or “Nex2”, initComp(Nex1) or initComp(Nex2) will do some typedef() trickery to declare a class Nex1Comp or Nex2Comp which is already linked to the corresponding NexComm object:
#define initComp(o) typedef NexComp<decltype(o)&, o> o ## Comp;
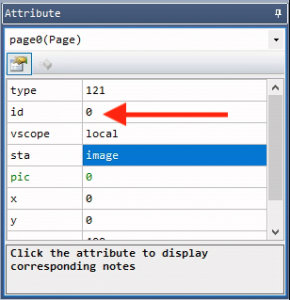
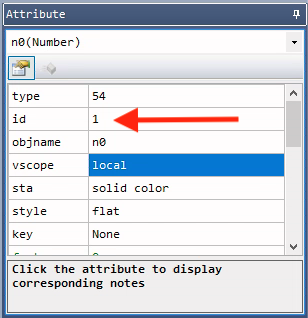
Now, in our .ino sketch, we can use the generated component class to declare the components which we want to address, like Nex1Comp myNumber(0,1). Wait… What about the page and component names??? We simply won’t use these for several reasons. And we don’t need to use these. Each page, whatever its name might be, has a unique id which can be found in the Attribute pane of the Nextion editor. Each component on a page, whatever its type and name might be, has a unique id which, you guess it, can be found in the Attribute pane of the Nextion editor.
Thus, for each HMI project, the combination of page id and component id allows to precisely identify and to address each single component. And a single byte which holds an ID is less memory consuming than a String object or a char[] array holding the names. Later on, when we’ll add listeners for Nextion events like Touch Press and Touch Release, the return codes which we’ll have to capture contain the numerical IDs, too, so there is only benefit in using the id values instead of the page and component names.
Let’s assemble and test everything
Our newNextion.h file has grown to 70 lines by addition of the 3 function macros at the beginning and by adding the NexComp class at the end:
template<class nexCommType, nexCommType nexComm>
class NexComp
{
  public:
    NexComp(uint8_t pageId, uint8_t objId = 0) : _page(pageId), _obj(objId) {}
    void setAttr(const char* attr, int16_t num)
    {
      this->_nexComm.cmdWrite((String)"p[" + this->_page + "].b[" + this->_obj + "]." + attr + "=" + num);
    }
    void setAttr(const char* attr, String txt)
    {
      this->_nexComm.cmdWrite((String)"p[" + this->_page + "].b[" + this->_obj + "]." + attr + "=\"" + txt + "\"");
    }
  private:
    static constexpr nexCommType& _nexComm = nexComm;
    uint8_t _page;
    uint8_t _obj;
};
The whole extended newNextion.h file can be downloaded here: newNextion.h. This small file is a library which handles now every aspect of the communication from the MCU (Arduino) to one or multiple Nextion HMIs!
To test it out, we need still a HMI project for our Nextion. It’s basically the same as last week, with a text field added, so that the setting of numeric AND text attributes can be played with. Here it is: graphdemo2.hmi
And finally an example sketch which allows to play with the new functionality: sketch_dec27_blog.ino As you can see when you load and open it, the use of our mini-library makes everything very simple, easy, and elegant:
#include "newNextion.h"
initCommDbg(Serial1, Serial, Nex1);
initComp(Nex1);

Nex1Comp n0(0, 1);
Nex1Comp j0(0, 2);
Nex1Comp t0(0, 3);

void setup() {
  Nex1.begin();
  t0.setAttr("txt", "");
  for (uint8_t i = 0; i <= 100; i++)
  {
    switch (i) {
      case 0:
        j0.setAttr("pco", 32768); break;
      case 50:
        j0.setAttr("pco", 32768); break;
      case 75:
        j0.setAttr("pco", 1024); break;
    }
    j0.setAttr("val", i);
    n0.setAttr("val", i);
    delay(50);
  }
  t0.setAttr("txt", "Ready!");
}

void loop() {
  //nothing to do here
}
This was the last Sunday blog in 2020. But our project will naturally go on. After a “New year” break next Sunday, we’ll start adding everything needed to catch the Nextion’s return data, and to listen to events. But you guess it, it will be equally simple and elegant. It’s highly exciting to assist to the birth of a new library. Isn’t it? Thank you for reading and for following! I wish you good luck and good health for 2021! Stay tuned!


