The Sunday Blog: Talking to your Nextion HMI
Part 6: Listen to your Nextion HMI
Over the last blog episodes we have made our Arduino talk to the Nextion HMI. We even managed to build a simple digital volt meter using just an Arduino and a Nextion. But up to now, we never cared about what the Nextion HMI would have to tell to the Arduino. So, let’s attack things from the other side today, and capture the data sent by the Nextion!
What to expect
A glance on the official documentation, the Nextion Instruction Set, Chapter 7 “Format of Nextion Return Data”, tells us what to expect: An overwhelming set of byte arrays which might be sent out by the Nextion: Error messages, status messages, data return after querying a component’s attribute, and much more. Let’s thus start with something simple and easy to understand before moving over to more complex things…
Capturing button press events
For that, we need a GUI on the Nextion, first. For this example project, we put just three buttons on one page:
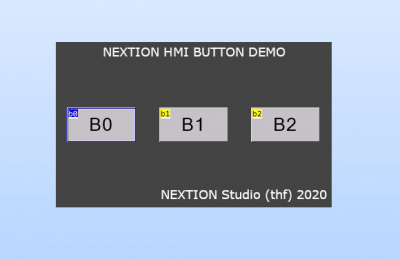
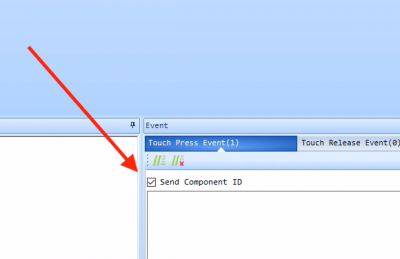
Always following the KISS principle (Keep It Simple and Safe), we even won’t need to write event code on the Nextion side, just check the “Send Component ID” in the Touch Press Event Pane for each of the 3 buttons:
If you don’t want to design this GUI, you can also download a ready-to-use version here: buttondemo.HMI
Compile it and upload it to your Nextion display using the Nextion Editor as usual.
Now, how to capture this data on the Arduino?
As a first approach, we’ll just capture the incoming bytes on the serial port to which the Nextion is connected, and output these over the debug serial port to the Serial Monitor of the Arduino IDE. This should give us a similar output to what me can see in the Simulator Return pane of the Nextion Debugger:
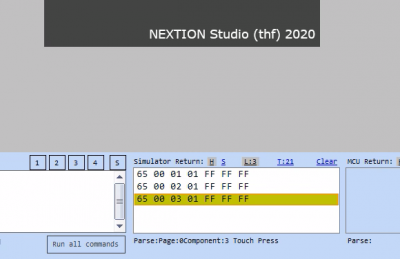
The output we see after pressing the three buttons consecutively corresponds to 3 packets, containing 7 bytes, each. The first byte (0x65) tells us that it was a Touch event, the second byte (0x00) that it happened on page 0, the third byte (0x01, 0x02, or 0x03) gives us the component id of the button which was pressed, and the fourth byte (0x01) tells us that this component was pressed. The remaining three bytes (0xFF, 0xFF, 0xFF) are the already well known terminator to tell us, that the data sequence is at its end.
Today, we won’t yet go as far as analyzing the return data in detail, we’ll just look at what we get from the Nextion, output it to the Arduino Serial Monitor and identify the famous terminator which will allow us to insert a line break to make the data better readable.
First things first
We’ll preferably use an Arduino Mega or any other Arduino compatible MCU which has more than just one serial port. As you remember from previous blog episodes, we need two serial ports, the default Serial port which is connected to the Arduino IDE for code upload and for monitoring data in the Serial Monitor, and another one to communicate with our Nextion HMI.
Start as explained in earlier blog episodes by adding #defines to ease addressing of the serial ports:
// Defines for Arduino Mega - adapt for your platform
#define nexSer Serial1 // Controlling the Nextion HMI using Serial1 (pin18 of the Arduino Mega) to prevent interfering with code upload
#define dbgSer Serial // Debug using default Serial over USB towards Arduino Serial Monitor
Then, we’ll need two unsigned 8bit integers, one to keep the incoming byte, and one to count the 0xFFs, so that we can know when a terminator (3 times 0xFF) has been sent:
uint8_t nexFFcount = 0;
uint8_t nexInbyte;
The setup() is pretty straight forward, initializing the two serial ports and waiting until these are ready:
void setup() {
  dbgSer.begin(9600);
  while(!dbgSer); // Wait for connect
  nexSer.begin(9600);
  while(!nexSer); // wait for connect
}
Then, there will be a loop within the loop() processing all incoming bytes at the beginning to prevent the serial buffer from overflow, even when the loop() later with more code will take a longer time for processing. That inner loop will read all bytes waiting in the serial buffer, one after the other, into the nexInbyte variable. At first, we check if the current byte is a 0xFF. If yes, we increase the nexFFcount variable by one. If it’s not an FF, we assume that any previous 0xFFs, be it zero, one, or two, were part of the data stream and not of the terminator. Thus, we reset the counter to zero.
Afterwards, we print the current byte, followed by a space character to the serial monitor. Finally, we check if the nexFFcount is equal to 3 which would mean that we have received a terminator. If no, we continue our processing, waiting for more bytes to come. If yes, we issue an empty println() to start a new line:
void loop() {
  while(nexSer.available())
  {
    nexInbyte = nexSer.read();
    if(nexInbyte == 0xFF)
    {
      nexFFcount++;
    } else
    {
      nexFFcount=0;
    }
    dbgSer.print(nexInbyte, HEX);
    dbgSer.print(" ");
    if(nexFFcount == 3)
    {
      Serial.println();
    }
  }
  // put your loop code here
}
Pretty simple and almost self-explaining, isn’t it? Again, if you don’t want to copy the code from here, you might download the ready-to-use .ino file here: NexSermon.ino
The wiring
Compared to the last weeks, the wiring will just be slightly more complex since this time, we need to connect both, the Nextion TX and RX lines to the respective RX and TX pins of the Arduino Mega:
- GND (black wire) => Arduino Mega GND pin
- +5V (red wire) => Arduino Mega 5V pin
- RX (yellow wire) => Arduino Mega TX1 pin 18
- TX (blue wire) => Arduino Mega RX1 pin 19
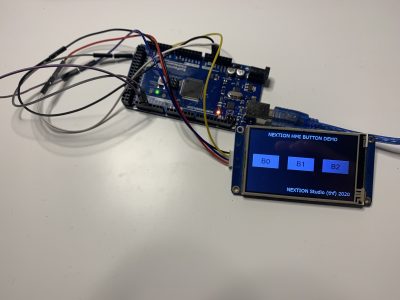
And that’s it. If all respective code is loaded into the Nextion and the Arduino, it should look like this:
And after having pressed the three screen buttons consecutively, the serial monitor of the Arduino IDE should show this:
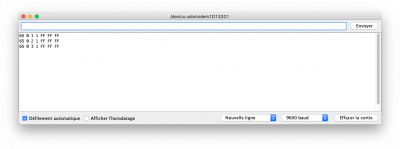
When you compare now the byte sequences with what we had in the Nextion Debugger/Simulator, we find that it’s exactly the same! Impressive, isn’t it?
But, I admit, it’s only a first step. Next week, we’ll extend our sketch to deeper analyze the incoming data and to take appropriate action, if needed. Thus, keep everything until next sunday and stay tuned!


