The Sunday Blog: Talking to your Nextion HMI
Part 4: Let your Arduino control your Nextion HMI
As promised in last Sunday’s blog episode, where we controlled our Nextion HMI directly from our PC using the Python3 command window, we are now up for a few episodes where we’ll see in detail, how to hook up and program an Arduino. Over the next weeks, we’ll see step by step how to make an Arduino talking to a Nextion, without using a prefabricated library, just by using the well documented ASCII command format. At the same time, this approach allows us to review some basics of the Arduino C/C++ dialect.
Parts of the following code might look not very efficient or elegant in the eyes of an advanced developer. That’s intended. We start with code which is easy to read and to understand for beginners. It will evolve over the next weeks and become more efficient and more refined. Promised.
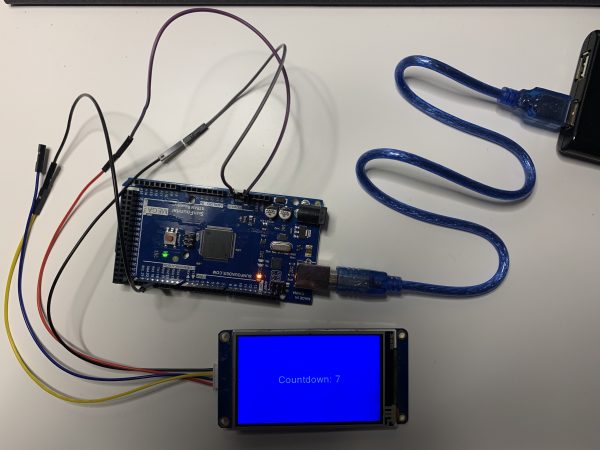
The wiring
As we most probably all know, is that most Arduinos have their default serial port, called “Serial” object in code, on pins 0 (RX) and 1 (TX). In parallel to these pins, there is a chip which converts this real serial into a virtual serial over USB. Thus, everything which happens on this serial port, happens also at the USB port: Code upload, and the communication with the Arduino IDE’s serial monitor. As we remember well from the first episode of this blog series, serial communication is a point to point protocol. Thus, we understand that the default serial port is monopolized by the USB communication between the Arduino and the IDE. To interact with the Nextion HMI, we need a second port. Ideally, we have an Arduino which has more that one. That’s why these examples were developed using a Mega. At low communication speeds, it is also possible to emulate an additional comm port in software. But that bit-banging on GPIO pins is very resource consuming and tends to pull the handbrake of our Arduino. So, I’ve let you know that this workaround exists, but I’m not a huge fan of it and I’ll continue with the Mega which has more than enough serial ports.
In today’s first step, we will (as last week in Python) just send commands from the Arduino to the Nextion and not yet care about return data. Thus we do not connect the Nextion’s TX pin (the blue wire) to anything for the moment. That leaves us with only 3 wires to connect:
- The Nextion’s GND (black) goes to the Arduino’s GND pin
- The Nextion’s +5V (red) goes to the Arduino’s 5V pin (for small displays with low consumption, taking from the Arduino’s power is ok. Bigger displays with higher power needs will require a separate power supply)
- The Nextion’s RX (yellow) goes to the Arduino’s TX1 pin (pin18 on the Mega)
That’s it.
The Nextion firmware
As we learned over the last weeks, the Nextion needs a GUI file, designed and compiled with the Nextion editor, then uploaded. For this week, we can re-use the one from last week, which has just one huge full width text component pseudo-transparent on a blue page background. Here it is if you don’t want to create it by hand: hello.HMI
The Arduino code
Defines
At the very beginning of our .ino file, we use a few #defines. This is just for convenience. A define can act like a compile-time variable, which means that it can hold a setting or parameter which will not change after the code is compiled and uploaded to the Arduino. We use two of these to set up which serial port is for debugging (in the serial monitor) and which one is for controlling the Nextion. If we decide later to use Serial3 instead of Serial1 for example, we simply change that #define and we don’t have to go through the whole code to look for places where Serial1 is probably addressed and change everything to Serial3 by hand. Another advantage of #defines is that they can act as switches for conditional code execution. In our case we #define DEBUG. Later in the code we check with #ifdef(DEBUG) and the following code portion until #endif will only execute if the corresponding #define exists. When we comment it out on top of our file, it will never execute. Since all that is handled by the compiler, it will save memory, since no space for the settings is required. The compiler will replace all occurrences of nexSer by Serial1 or whatever we #defined. Same for the code portions: When we comment out the #define DEBUG, all the depending code portions will already not be compiled, resulting in a smaller hex file and thus less flash memory usage.
#define nexSer Serial1 // Controlling the Nextion HMI using Serial1 (pin18 of the Arduino Mega) to prevent interfering with code upload
#define dbgSer Serial  // Debug using default Serial over USB towards Arduino Serial Monitor
#define DEBUG          // Comment this out if you don't need to see what happens in the Serial Monitor
The terminator
As we learned earlier, almost all commands from the external controller to the Nextion HMI are simple ASCII text. But the Nextion has to know when one command ends and a new one starts. For this, we have to send three 0xFF bytes (the terminator) after each command. Since this is a very repetitive task, we wrap it up in a simple function which takes our command string, sends it out to the Nextion, and sends three times 0xFF afterwards. At this point, we add our conditional debug routine which simply logs everything which we send to the Nextion at the same time (a few microseconds later) to the serial monitor. If we commented out the #define DEBUG above, the dark red and italic code will not make it into the hex file.
void sendCmd(String cmd)
{
nexSer.print(cmd);
nexSer.write("\xFF\xFF\xFF");
#ifdef DEBUG
if(cmd.length() > 0)
{
dbgSer.print("Sending command : ");
dbgSer.println(cmd);
} else
{
dbgSer.println("Empty command issued to clear the buffer");
}
#endif
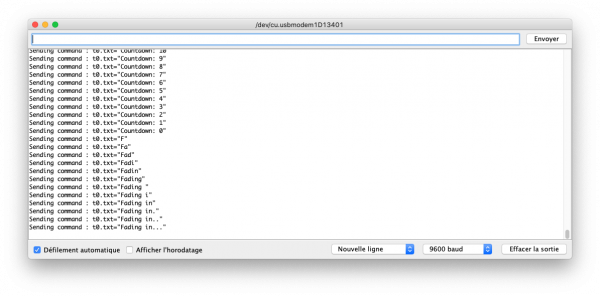
}Here is an example of the debug information in the serial monitor:
Setting everything up…
…is done as usual in void setup(). We initialize nexSer (alias Serial1) and dbgSer (alias Serial) and we wait until they are ready with an empty while() loop before moving on. Then, to prevent a corrupted buffer on the Nextion side after initializing the serial port on the Arduino side, we just send an empty command, so that senCmd will just issue a terminator. This should normally not be needed, but at least my Mega clone behaved strange sometimes, especially after a cold boot, so I decided to add that to be sure.
void setup() {
dbgSer.begin(9600);
while(!dbgSer)
{
  // wait for connect
}
nexSer.begin(9600);
while(!nexSer)
{
  // wait for connect
}
sendCmd(""); // clear the buffer
sendCmd("t0.txt=\"Hello world\""); //Display a greeting and wait two seconds
delay(2000);
}
Remember: Each command is sent as a string. If this string contains a string, the latter has to be put into escaped quotes! We’ll see if we can’t find a more comfortable way to deal with that in one of the next episodes, but for the moment, we have to take care.
And now the loop
In the loop(), I have created a few animated text demos which seem (to me) pretty simple and self explaining. If you don’t, feel free to ask questions in the Nextion forums. Basically, it’s all about generating a string, display it on the Nextion, wait a little, generate the next string, and so on. There is a countdown, then text fading in and out, and finally flashing. Just different use cases for our sendCmd() function, nothing more.
void loop() {
  //Declare variables
  String mytext;
  String message;
  int8_t i;

  //Countdown example
  message = "Countdown: ";
  for (i=10; i>=0; i--)
  {
    mytext = "\"" + message + i + "\"";
    sendCmd("t0.txt=" + mytext);
    delay(1000);
  }

  //Fading in example
  message = "Fading in...";
  for(i=1; i<=message.length(); i++)
  {
    mytext = "\"" + message.substring(0,i) + "\"";
    sendCmd("t0.txt=" + mytext);
    delay(100);
  }
  delay(2000);

  //Fading out example
  message = "Fading out...";
  for(i=message.length(); i>=0; i--)
  {
    mytext = "\"" + message.substring(0,i) + "\"";
    sendCmd("t0.txt=" + mytext);
    delay(100);
  }
  delay(2000);

  //Flashing example
  message="Flashing";
  for(i=0; i<10; i++)
  {
    mytext = "\"" + message + "\"";
    sendCmd("t0.txt=" + mytext);  //display the message
    delay(250);
    mytext = "\"\"";
    sendCmd("t0.txt=" + mytext);  //hide the message
    delay(250);
  }
  delay(2000);
}
The end (for today)
No, you don’t have to type all that code. You may download the ino file here: sketch_nov22_blog.ino
Have fun with your animated text display!


